🏷️ #javascript #python #vuejs #django #backend #frontend #webdev

Create a Modern Application with Django and Vue #2

In part two, we are going to talk about how to connect the backend and the frontend. Currently, the industry standard is to use something called REST API, which stands for representational state transfer application programming interface. API refers to the connection between two software applications, and REST refers to a specific architecture that this type of connection follows.

API

A REST API request usually consists of an endpoint, which points to the server, an HTTP method, a header and a body. The header provides meta information such as caching, user authentication and AB testing, and the body contains data that the client wants to send to the server.

However, REST API has one small flaw, it is impossible to design APIs that only fetch the exact data that the client requires, so it is very common for the REST API to overfetch or underfetch. GraphQL was created to solve this problem. It uses schemas to make sure that with each request, it only fetches data that is required, we’ll see how this works later.

Before proceeding to the rest of this article, make sure you are familiar with Django and Vue.js. If not, please go through the following tutorials first:

➡️ Get the source code for FREE!

Setting up GraphQL with Django #

Let’s start by setting up GraphQL in the backend. You need to install a new package called graphene-django. Run the following command:

1
pip install graphene-django

Next, go to settings.py and find the INSTALLED_APPS variable. You must add graphene-django inside so that Django is able to find this module.

1
2
3
4
5
INSTALLED_APPS = [
  . . .
  "blog",
  "graphene_django",
]

Configuring graphene-django #

There are still a few things you need to do before you can use GraphQL. First, you need to setup a URL pattern to serve the GraphQL APIs. Go to urls.py and add the following code:

1
2
3
4
5
6
7
from django.views.decorators.csrf import csrf_exempt
from graphene_django.views import GraphQLView

urlpatterns = [
    . . .
    path("graphql", csrf_exempt(GraphQLView.as_view(graphiql=True))),
]

Next, create the schemas and tell Django where to find them in the settings.py. GraphQL schemas define a pattern that allows Django to translate the database models into GraphQL and vice versa. Let’s take the Site model as an example.

 1
 2
 3
 4
 5
 6
 7
 8
 9
10
11
class Site(models.Model):
    name = models.CharField(max_length=200)
    description = models.TextField()
    logo = models.ImageField(upload_to='site/logo/')

    class Meta:
        verbose_name = 'site'
        verbose_name_plural = '1. Site'

    def __str__(self):
        return self.name

Create a schema.py file inside the blog directory.

 1
 2
 3
 4
 5
 6
 7
 8
 9
10
11
12
13
14
15
16
17
import graphene
from graphene_django import DjangoObjectType
from blog import models

# Define type
class SiteType(DjangoObjectType):
    class Meta:
        model = models.Site

# The Query class
class Query(graphene.ObjectType):
    site = graphene.Field(types.SiteType)

    def resolve_site(root, info):
        return (
            models.Site.objects.first()
        )

As you can see, this file is divided into three parts. First, you must import the necessary packages and models.

Next, SiteType class is declared, and this SiteType is connected with the Site model.

Lastly, there is a Query class. This class is what allows you to retrieve information using the GraphQL API. To create or update information, you need to use a different class called Mutation, which we’ll discuss in the next article.

Inside the Query class, there is a resolve_site function that returns the first record of the Site model. This method automatically binds with the site variable due to its name. This part works exactly the same as the regular Django QuerySet.

Creating schemas #

Now you can do the same for all of the models. To make sure the schema file isn’t too big, I separated them into schema.py, types.py and queries.py.

schema.py

1
2
3
4
5
import graphene
from blog import queries


schema = graphene.Schema(query=queries.Query)

types.py

 1
 2
 3
 4
 5
 6
 7
 8
 9
10
11
12
13
14
15
16
17
18
19
20
21
22
23
24
25
26
27
28
import graphene
from graphene_django import DjangoObjectType
from blog import models


class SiteType(DjangoObjectType):
    class Meta:
        model = models.Site


class UserType(DjangoObjectType):
    class Meta:
        model = models.User


class CategoryType(DjangoObjectType):
    class Meta:
        model = models.Category


class TagType(DjangoObjectType):
    class Meta:
        model = models.Tag


class PostType(DjangoObjectType):
    class Meta:
        model = models.Post

queries.py

 1
 2
 3
 4
 5
 6
 7
 8
 9
10
11
12
13
14
15
16
17
18
19
20
21
22
23
24
25
26
27
28
29
30
31
32
33
34
35
36
37
38
39
40
41
42
43
44
45
46
47
48
49
import graphene
from blog import models
from blog import types


# The Query class
class Query(graphene.ObjectType):
    site = graphene.Field(types.SiteType)
    all_posts = graphene.List(types.PostType)
    all_categories = graphene.List(types.CategoryType)
    all_tags = graphene.List(types.TagType)
    posts_by_category = graphene.List(types.PostType, category=graphene.String())
    posts_by_tag = graphene.List(types.PostType, tag=graphene.String())
    post_by_slug = graphene.Field(types.PostType, slug=graphene.String())

    def resolve_site(root, info):
        return (
            models.Site.objects.first()
        )

    def resolve_all_posts(root, info):
        return (
            models.Post.objects.all()
        )

    def resolve_all_categories(root, info):
        return (
            models.Category.objects.all()
        )

    def resolve_all_tags(root, info):
        return (
            models.Tag.objects.all()
        )

    def resolve_posts_by_category(root, info, category):
        return (
            models.Post.objects.filter(category__slug__iexact=category)
        )

    def resolve_posts_by_tag(root, info, tag):
        return (
            models.Post.objects.filter(tag__slug__iexact=tag)
        )

    def resolve_post_by_slug(root, info, slug):
        return (
            models.Post.objects.get(slug__iexact=slug)
        )

Finally, you need to tell Django where to find the schema file. Go to settings.py and add the following code:

1
2
3
4
# Configure GraphQL
GRAPHENE = {
    "SCHEMA": "blog.schema.schema",
}

To verify that the schemas work, open your browser and go to http://127.0.0.1:8000/graphql . You should see the GraphiQL interface.

GraphiQL

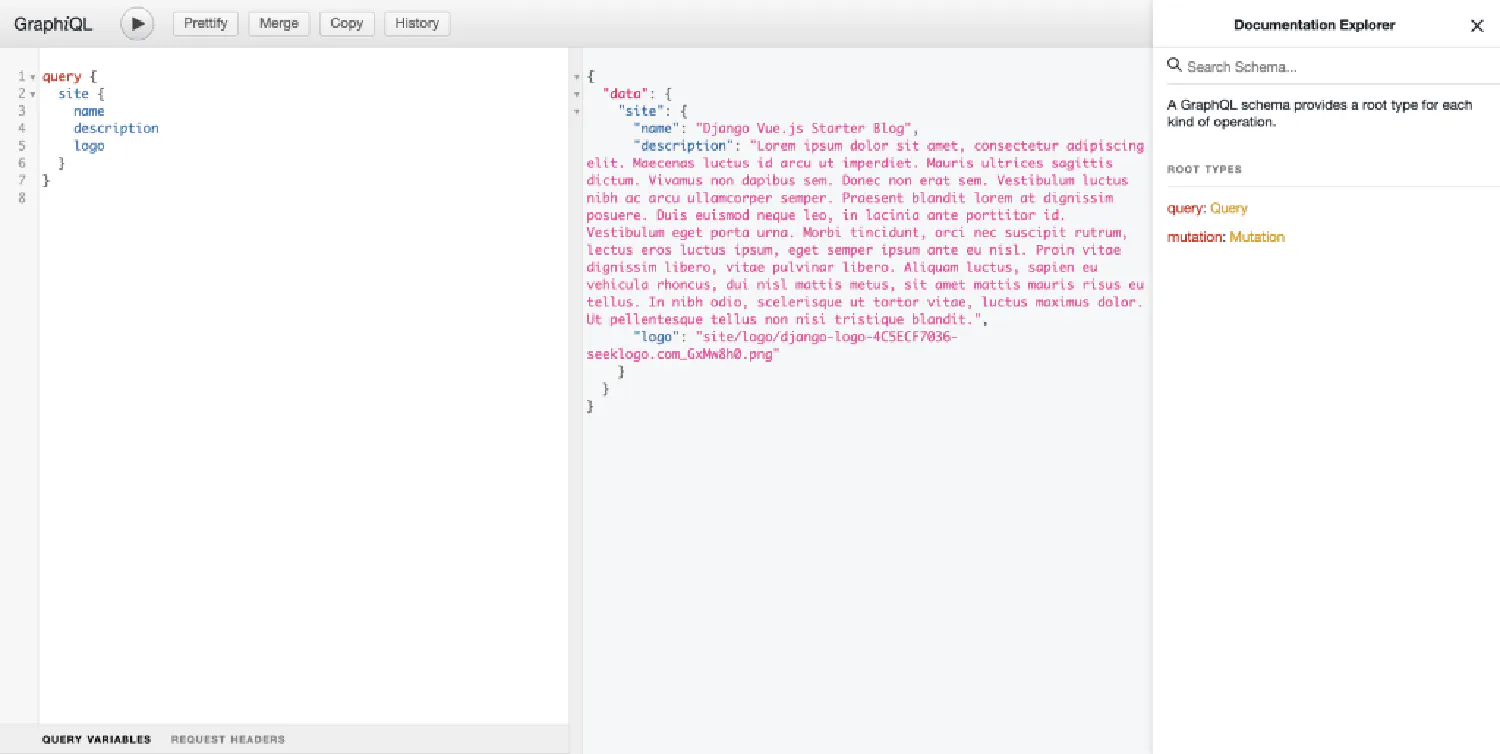
Notice how we are retrieving information in this example, it’s the GraphQL language, and it is how we are going to retrieve data in the frontend, which you’ll see later.

Setting up CORS #

Before you can move on to the frontend, there is still something you need to take care of. By default, data can only be transferred within the same application for security reasons, but in our case we need the data to flow between two applications. To tackle this problem, you must enable the CORS (cross origin resource sharing) functionality.

First, install the django-cors-headers package. Inside the backend app, run the following command:

1
pip install django-cors-headers

Add "corsheaders" to the INSTALLED_APPS variable.

1
2
3
4
INSTALLED_APPS = [
  . . .
  "corsheaders",
]

Then add "corsheaders.middleware.CorsMiddleware" to the MIDDLEWARE variable:

1
2
3
4
MIDDLEWARE = [
  "corsheaders.middleware.CorsMiddleware",
  . . .
]

And finally, add the following code to the settings.py.

1
2
CORS_ORIGIN_ALLOW_ALL = False
CORS_ORIGIN_WHITELIST = ("http://localhost:8080",) # Matches the port that Vue.js is using

Setting up Apollo with Vue.js #

Now it’s time for us to move to the frontend. First, install the Apollo library. It allows you to use GraphQL in the Vue app. To do that, run the following command:

1
npm install --save graphql graphql-tag @apollo/client

Under the src directory, create a new file called apollo-config.js and add the following code:

 1
 2
 3
 4
 5
 6
 7
 8
 9
10
11
12
13
14
15
16
17
18
19
import {
  ApolloClient,
  createHttpLink,
  InMemoryCache,
} from "@apollo/client/core";

// HTTP connection to the API
const httpLink = createHttpLink({
  uri: "http://127.0.0.1:8000/graphql", // Matches the url and port that Django is using
});

// Cache implementation
const cache = new InMemoryCache();

// Create the apollo client
const apolloClient = new ApolloClient({
  link: httpLink,
  cache,
});

Then go to main.js and import the apolloClient:

1
2
import { apolloClient } from "@/apollo-config";
createApp(App).use(router).use(apolloClient).mount("#app");

Now we can use the GraphQL language we just saw to retrieve data from the backend. Let’s see an example. Go to App.vue, and here we’ll retrieve the name of our website.

 1
 2
 3
 4
 5
 6
 7
 8
 9
10
11
12
13
14
15
16
17
18
19
20
21
22
23
24
25
26
27
28
29
30
31
32
33
34
35
36
37
38
<template>
  <div class="container mx-auto max-w-3xl px-4 sm:px-6 xl:max-w-5xl xl:px-0">
    <div class="flex flex-col justify-between h-screen">
      <header class="flex flex-row items-center justify-between py-10">
        <div class="nav-logo text-2xl font-bold">
          <router-link to="/" v-if="mySite">{{ mySite.name }}</router-link>
        </div>
        . . .
      </header>
      . . .
    </div>
  </div>
</template>

<script>
import gql from "graphql-tag";

export default {
  data() {
    return {
      mySite: null,
    };
  },

  async created() {
    const siteInfo = await this.$apollo.query({
      query: gql`
        query {
          site {
            name
          }
        }
      `,
    });
    this.mySite = siteInfo.data.site;
  },
};
</script>

It is my personal preference to create a separate file for all the queries and then import it into the .vue file.

src/queries.js

1
2
3
4
5
6
7
8
9
import gql from "graphql-tag";

export const SITE_INFO = gql`
  query {
    site {
      name
    }
  }
`;

App.vue

 1
 2
 3
 4
 5
 6
 7
 8
 9
10
11
12
13
14
15
16
17
18
19
20
. . .

<script>
import { SITE_INFO } from "@/queries";

export default {
  data() {
    return {
      mySite: null,
    };
  },

  async created() {
    const siteInfo = await this.$apollo.query({
      query: SITE_INFO,
    });
    this.mySite = siteInfo.data.site;
  },
};
</script>

The category page #

Now we have a left over problem from the previous article. When we invoke a router, how does the router know which page should be returned? For instance, when we click on a link Category One, a list of posts that belong to category one should be returned, but how does the router know how to do that? Let’s see an example.

First, in the router/index.js file where we defined all of our routes, we should set a segment of the URL pattern as a variable. In the following example, the word after /category/ will be assigned to the variable category. This variable will be accessible in the CategoryView component.

 1
 2
 3
 4
 5
 6
 7
 8
 9
10
11
12
13
14
15
16
17
18
19
20
21
22
23
import { createRouter, createWebHistory } from "vue-router";
. . .

const routes = [
  {
    path: "/",
    name: "Home",
    component: HomeView,
  },
  {
    path: "/category/:category",
    name: "Category",
    component: CategoryView,
  },
  . . .
];

const router = createRouter({
  history: createWebHistory(process.env.BASE_URL),
  routes,
});

export default router;

Next, in the AllCategories view (the one that will show a list of all categories), we will pass some information to this category variable.

 1
 2
 3
 4
 5
 6
 7
 8
 9
10
11
12
13
14
15
16
<template>
  <div class="flex flex-col place-content-center place-items-center">
    <div class="py-8 border-b-2">
      <h1 class="text-5xl font-extrabold">All Categories</h1>
    </div>
    <div class="flex flex-wrap py-8">
      <router-link
        v-for="category in this.allCategories"
        :key="category.name"
        class=". . ."
        :to="`/category/${category.slug}`"
        >{{ category.name }}</router-link
      >
    </div>
  </div>
</template>

In the Category view, we can access this category variable using this.$route property.

 1
 2
 3
 4
 5
 6
 7
 8
 9
10
11
12
13
14
15
16
17
18
19
20
21
22
23
24
25
26
<script>
// @ is an alias to /src
import PostList from "@/components/PostList.vue";
import { POSTS_BY_CATEGORY } from "@/queries";

export default {
  components: { PostList },
  name: "CategoryView",

  data() {
    return {
      postsByCategory: null,
    };
  },

  async created() {
    const posts = await this.$apollo.query({
      query: POSTS_BY_CATEGORY,
      variables: {
        category: this.$route.params.category,
      },
    });
    this.postsByCategory = posts.data.postsByCategory;
  },
};
</script>

And finally, the corresponding posts can be retrieved using the POSTS_BY_CATEGORY query.

 1
 2
 3
 4
 5
 6
 7
 8
 9
10
11
12
export const POSTS_BY_CATEGORY = gql`
  query ($category: String!) {
    postsByCategory(category: $category) {
      title
      slug
      content
      isPublished
      isFeatured
      createdAt
    }
  }
`;

With this example, you should be able to create the tag and post page.

Creating and updating information with mutations #

From the previous section, we learned that we can use queries to retrieve information from the backend and send it to the frontend. However, in a modern web application, it is very common for you to send information from the frontend to the backend. To do that, we need to talk about a new concept called mutation.

Let’s go back to the backend and cd into the blog directory, and then create a file called mutations.py. In this example, let’s investigate how you can pass data to the backend in order to create a new user.

 1
 2
 3
 4
 5
 6
 7
 8
 9
10
11
12
13
14
15
16
17
18
19
20
21
22
import graphene
from blog import models, types


# Mutation sends data to the database
class CreateUser(graphene.Mutation):
    user = graphene.Field(types.UserType)

    class Arguments:
        username = graphene.String(required=True)
        password = graphene.String(required=True)
        email = graphene.String(required=True)

    def mutate(self, info, username, password, email):
        user = models.User(
            username=username,
            email=email,
        )
        user.set_password(password)
        user.save()

        return CreateUser(user=user)

On line 7, recall that the UserType is tied with the User model.

Line 9 to 12, to create a new user, you need to pass three arguments, username, password and email.

Line 15 to 18, this should be very familiar to you, it is the same way you create a new item using the Django QuerySet.

Line 19, this line of code sets the password. For security reasons, you can not save the user’s original password in the database, and set_password() method can make sure it is encrypted.

After that, you must make sure this mutation.py file is included in the GraphQL schema. Go to schema.py:

1
2
3
4
5
import graphene
from blog import queries, mutations


schema = graphene.Schema(query=queries.Query, mutation=mutations.Mutation)

To make sure it works, open your browser and go to http://127.0.0.1:8000/graphql to access the GraphiQL interface.

Mutation

 1
 2
 3
 4
 5
 6
 7
 8
 9
10
11
12
mutation {
  createUser(
    username: "testuser2022"
    email: "testuser2022@test.com"
    password: "testuser2022"
  ) {
    user {
      id
      username
    }
  }
}

I think you already know how to use this in the frontend. As an example, this is what I did.

 1
 2
 3
 4
 5
 6
 7
 8
 9
10
11
12
13
14
15
16
17
18
19
20
21
22
23
24
25
<script>
import { USER_SIGNUP } from "@/mutations";

export default {
  name: "SignUpView",

  data() {. . .},

  methods: {
    async userSignUp() {
      // Register user
      const user = await this.$apollo.mutate({
        mutation: USER_SIGNUP,
        variables: {
          username: this.signUpDetails.username,
          email: this.signUpDetails.email,
          password: this.signUpDetails.password,
        },
      });
     // Do something with the variable user
     . . .
    },
  },
};
</script>

src/mutations.js

 1
 2
 3
 4
 5
 6
 7
 8
 9
10
11
12
import gql from "graphql-tag";

export const USER_SIGNUP = gql`
  mutation ($username: String!, $email: String!, $password: String!) {
    createUser(username: $username, email: $email, password: $password) {
      user {
        id
        username
      }
    }
  }
`;

User authentication with Django and Vue.js #

Now that you know how to send data to the backend, user authentication shouldn’t be too hard. You ask the user to input their username and password and send that information to the backend, and then in the backend, Django finds the user based on username, and it’ll try to match the password with the one stored in the database. If the match is successful, the user is logged in.

However, in practice, this plan has some problems. First, sending the user password back and forth isn’t exactly safe. You need some way to encrypt the data. The most commonly used method is JWT, which stands for JSON Web Token. It encrypts JSON information into a token. You can see an example here: https://jwt.io/ .

This token will be saved inside the browser’s local storage , and as long as there is a token present, the user will be considered logged in.

The second problem is caused by Vue’s component system. We know that each component is independent. If one component changes, it does not affect the others. However, in this case, we want all components to share the same state. If the user is logged in, we want all components to recognize the user’s state as logged in.

You need a centralized place to store this information (that the user is logged in), and all components should be able to read data from it. To do that, you’ll need to use Pinia , which is Vue’s new official store library created based on Vuex.

JWT in the Backend #

First, let’s integrate JWT with the Django backend. To do that, you need to install another package called django-graphql-jwt.

1
pip install django-graphql-jwt

Then go to settings.py and add a middleware as well as authentication backend. The configuration will overwrite Django’s default setting, allowing it to use JWT instead.

 1
 2
 3
 4
 5
 6
 7
 8
 9
10
11
12
13
14
15
16
17
18
19
MIDDLEWARE = [
    "django.contrib.auth.middleware.AuthenticationMiddleware",
]

# Configure GraphQL

GRAPHENE = {
    "SCHEMA": "blog.schema.schema",
    'MIDDLEWARE': [
        'graphql_jwt.middleware.JSONWebTokenMiddleware',
    ],
}

# Auth Backends

AUTHENTICATION_BACKENDS = [
    'graphql_jwt.backends.JSONWebTokenBackend',
    'django.contrib.auth.backends.ModelBackend',
]

To use this package, go to mutations.py and add the following code:

1
2
3
4
5
6
7
import graphql_jwt


class Mutation(graphene.ObjectType):
    token_auth = graphql_jwt.ObtainJSONWebToken.Field()
    verify_token = graphql_jwt.Verify.Field()
    refresh_token = graphql_jwt.Refresh.Field()

We can test it in the GraphiQL interface.

Wrong Password

User Auth Wrong Password

User Authenticated

User Authenticated

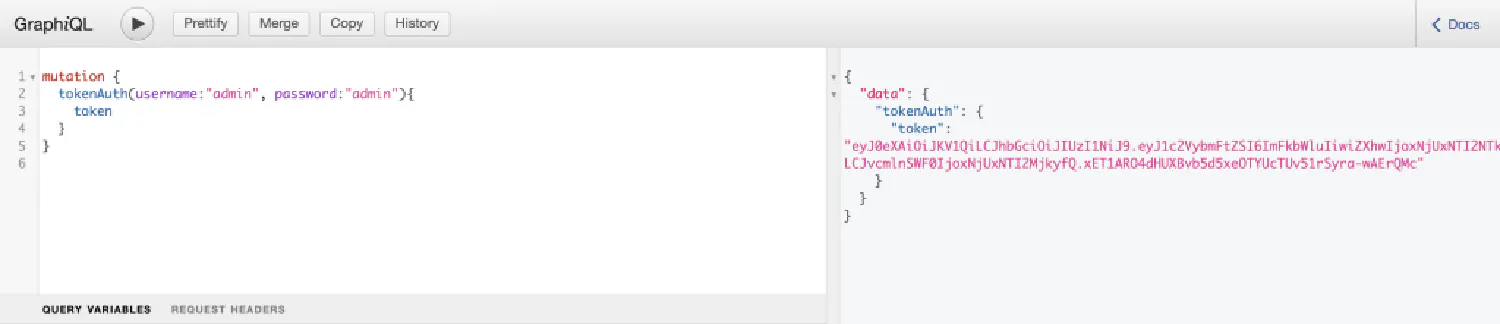
As you can see, the input arguments are username and password, and if the user is authenticated, an encrypted token will be returned. Later, you can save this token in the browser’s local storage.

If you want, you can also customize the behaviour of ObtainJSONWebToken. Go back to mutations.py:

 1
 2
 3
 4
 5
 6
 7
 8
 9
10
11
# Customize the ObtainJSONWebToken behavior to include the user info

class ObtainJSONWebToken(graphql_jwt.JSONWebTokenMutation):
    user = graphene.Field(types.UserType)

    @classmethod
    def resolve(cls, root, info, **kwargs):
        return cls(user=info.context.user)

class Mutation(graphene.ObjectType):
    token_auth = ObtainJSONWebToken.Field()

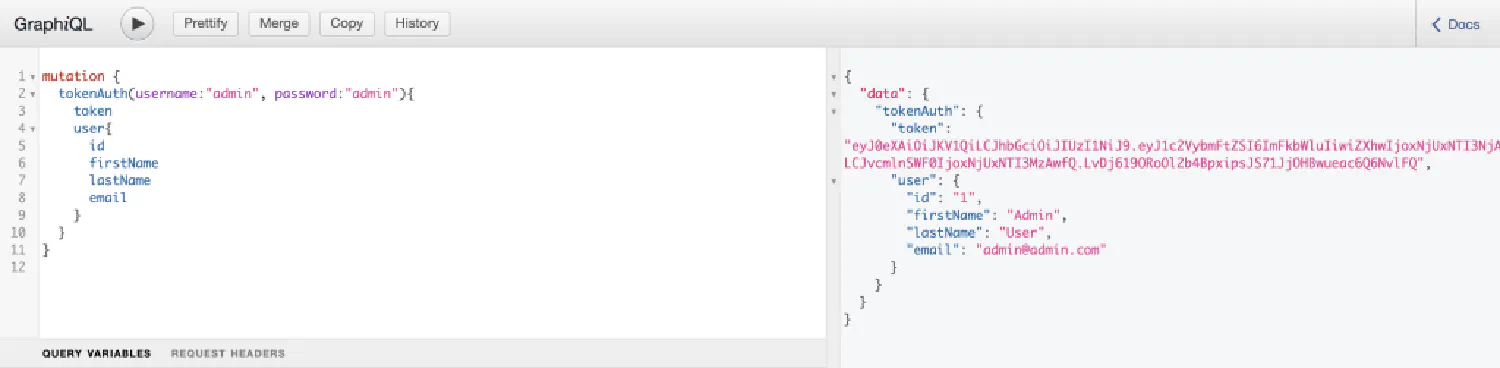
Notice that the ObtainJSONWebToken extends to the default JSONWebTokenMutation, and then in the Mutation class, you can use ObtainJSONWebToken instead.

Now you can make GraphQL return more information about the user.

User auth customization

Pinia in the Frontend #

Now it’s time for us to solve the second problem in the frontend. Let’s start by installing Pinia.

1
npm install pinia

Then, go to main.js and make sure that your app is using Pinia.

1
2
3
import { createPinia } from "pinia";

createApp(App).use(createPinia()).use(router).use(apolloProvider).mount("#app");

Go back to the src directory and create a folder called stores. This is where we’ll put all of our stores. For now, you only need a user store, so create a user.js file:

 1
 2
 3
 4
 5
 6
 7
 8
 9
10
11
12
13
14
15
16
17
18
19
20
21
22
23
24
25
26
27
28
29
30
31
32
33
34
35
36
37
38
39
import { defineStore } from "pinia";

export const useUserStore = defineStore({
  id: "user",
  state: () => ({
    token: localStorage.getItem("token") || null,
    user: localStorage.getItem("user") || null,
  }),
  getters: {
    getToken: (state) => state.token,
    getUser: (state) => JSON.parse(state.user),
  },
  actions: {
    setToken(token) {
      this.token = token;

      // Save token to local storage
      localStorage.setItem("token", this.token);
    },
    removeToken() {
      this.token = null;

      // Delete token from local storage
      localStorage.removeItem("token");
    },
    setUser(user) {
      this.user = JSON.stringify(user);

      // Save user to local storage
      localStorage.setItem("user", this.user);
    },
    removeUser() {
      this.user = null;

      // Delete user from local storage
      localStorage.removeItem("user");
    },
  },
});

Notice that this store consists of mainly three sections, state, getters and actions. If you already know how to create a Vue application, this should be fairly easy to understand.

state is like the data() method in a Vue component, it is where you declare variables, except these variables will be accessible to all components. In our example, Vue will first try to get the token from the local storage, if the token does not exist, the variable will be assigned the value null.

getters are the equivalent of the computed variables. It performs simple actions, usually just returning the value of a state. Again, it is accessible to all components and pages.

And finally actions are like the methods in a Vue component. They usually perform some action using the states. In this case, you are saving/removing the user’s token and information.

One more thing you need to note is that you cannot save objects inside the local storage, only strings. That is why you have to use stringify() and parse() to turn the data into a string and then back into an object.

Next, you need to use this store when log the user in. I created a SignIn.vue file like this:

 1
 2
 3
 4
 5
 6
 7
 8
 9
10
11
12
13
14
15
16
17
18
19
20
21
22
23
24
25
26
27
28
29
30
31
32
33
34
35
36
<script>
import { useUserStore } from "@/stores/user";
import { USER_SIGNIN } from "@/mutations";

export default {
  name: "SignInView",

  setup() {
    const userStore = useUserStore();
    return { userStore };
  },

  data() {
    return {
      signInDetails: {
        username: "",
        password: "",
      },
    };
  },

  methods: {
    async userSignIn() {
      const user = await this.$apollo.mutate({
        mutation: USER_SIGNIN,
        variables: {
          username: this.signInDetails.username,
          password: this.signInDetails.password,
        },
      });
      this.userStore.setToken(user.data.tokenAuth.token);
      this.userStore.setUser(user.data.tokenAuth.user);
    },
  },
};
</script>

Line 2, imported the user store you just created.

Line 9-12, call the user store in the setup hook, this makes Pinia easier to work with without any additional map functions.

Line 32-33, invoke the setToken() and setUser() actions we just created, this will save the information inside the local storage.

Now, this is how you can log the user in, but what if the user is already signed in? Let’s take a look at an example:

 1
 2
 3
 4
 5
 6
 7
 8
 9
10
11
12
13
14
15
16
17
18
19
20
21
22
23
24
25
26
27
28
29
30
31
32
33
34
35
36
37
38
39
40
41
42
<script>
import { SITE_INFO } from "@/queries";
import { useUserStore } from "@/stores/user";

export default {
  setup() {
    const userStore = useUserStore();
    return { userStore };
  },

  data() {
    return {
      menuOpen: false,
      mySite: null,
      user: {
        isAuthenticated: false,
        token: this.userStore.getToken || "",
        info: this.userStore.getUser || {},
      },
      dataLoaded: false,
    };
  },

  async created() {
    const siteInfo = await this.$apollo.query({
      query: SITE_INFO,
    });
    this.mySite = siteInfo.data.site;

    if (this.user.token) {
      this.user.isAuthenticated = true;
    }
  },

  methods: {
    userSignOut() {
      this.userStore.removeToken();
      this.userStore.removeUser();
    },
  },
};
</script>

Line 18-19, try to get the token and user info from the store.

Line 31-33, if the token exists, then the user is considered as authenticated.

Line 38-41, this method will log the user out when invoked.


If you think my articles are helpful, please consider making a donation to me. Your support is greatly appreciated.

Subscribe to my newsletter ➡️

✅ News and tutorials every other Monday

✅ Unsubscribe anytime

✅ No spam. Always free.