HTML Basics #1: A Brief Introduction
This article is outdated. If you are interested in learning HTML and CSS, check out my new course ➡️ HTML & CSS: A Practical Guide.
HTML, short for Hypertext Markup Language, is the standard language used for creating web pages and other information that can be displayed in a web browser. HTML consists of elements and tags that are used to structure and format content, such as text, images, videos, and links. It provides the basic building blocks for creating web pages and gives them structure, making it easier for both humans and computers to understand and interact with the content.
Generally speaking, other technologies are used alongside. The Cascading Style Sheet (CSS), for example, can be used to describe the page’s appearance, and JavaScript can define the web page’s behavior and make it more interactive for the user. We will talk about these technologies in detail in future articles.
Before proceeding with this article, make sure you have a code editor and a browser installed on your computer.
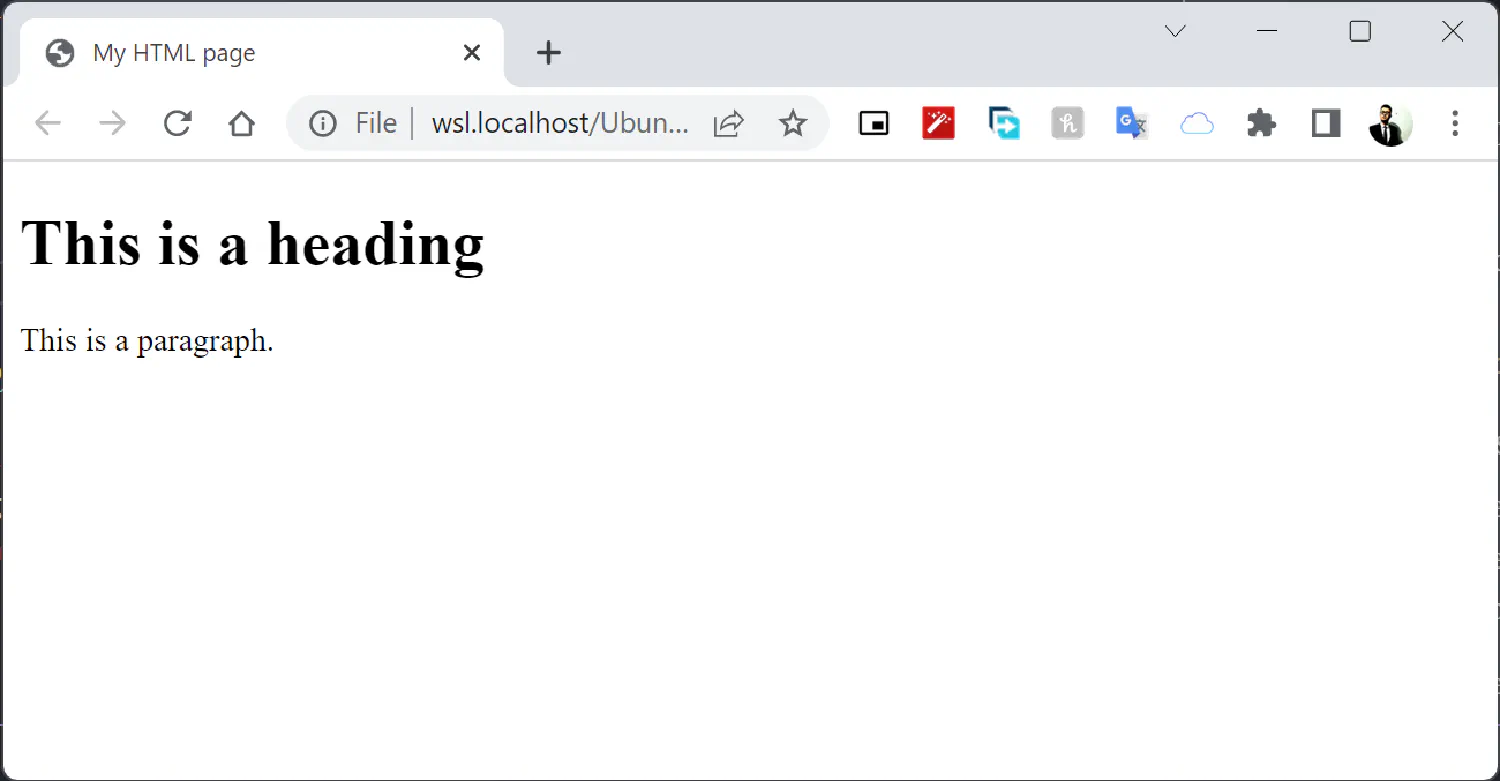
Here is an example of an HTML document. An HTML document is a file with extension .html.
| |
You may open it with the text editor to see the source code, or open it with the browser to see the rendered result.
Elements #
Elements are the basic components of this HTML file. An HTML element is usually defined by a start tag and an end tag, and with some content in between like this:
| |
However, there are some exceptions, <hr>, for example, does not need content or an end tag. It defines a horizontal rule on the web page, which usually indicates a thematic change between content.
The HTML elements are usually in a nested structure, which means one element can contain other elements like this:
| |
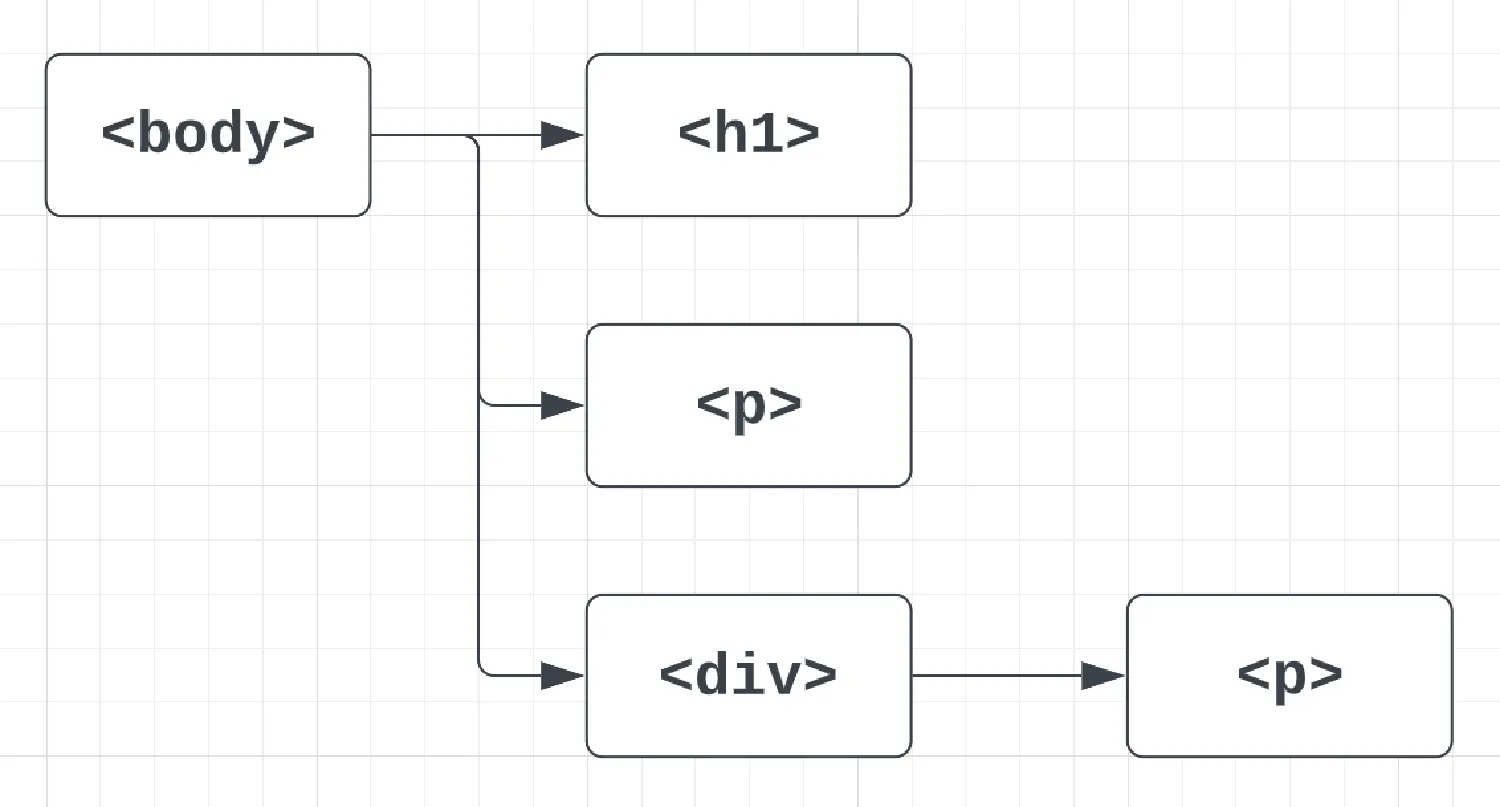
The <body> has three elements inside, a heading <h1>, a paragraph <p>, and a <div>. And the <div> element has another paragraph <p> inside. The plot above is what the structure tree looks like. There is no limit on how long or complex this tree could be. This is related to a fundamental concept in frontend development called the Document Object Model (DOM). With the DOM, we can find and change any element in an HTML file.
Another important note is that you should never escape the end tag (if it needs one). Sometimes the elements will display correctly, but you should never rely on that. It can cause unexpected consequences.
Attributes #
Usually, each HTML element is assigned multiple attributes. They provide additional information to the HTML elements. They are always specified in the start tag, and they usually come in name/value pairs like this:
| |
There are two crucial things you should always remember.
- The attributes should always be in lower case. It is not a requirement, but it is highly recommended. XHTML , the strict version of HTML, actually demands that.
- The value of the attributes should always be in quotes. It doesn’t matter if you use single or double quotes, but they should always match. Using double quotes is highly recommended. Again, XHTML requires you to use double quotes.
ids and classes #
The ids and classes are two attributes that require our special attention. The id is unique, and it can only be used to identify one element in an HTML file. The class does not have to be unique, and it is used to identify a group of elements in an HTML file. One element can have both a class and an id.
| |
When combined with technologies like CSS and JavaScript, these ids and classes allow us to change the appearance and behavior of any part of our web page. And we will talk about both of them in detail in the future.
Some common elements and attributes #
Next, let’s take a look at some commonly used HTML elements. Please note that this is not a complete list of all elements for HTML. That would make this article long and tedious. However, here is a complete tutorial on HTML if you need them.
Headings and paragraphs #
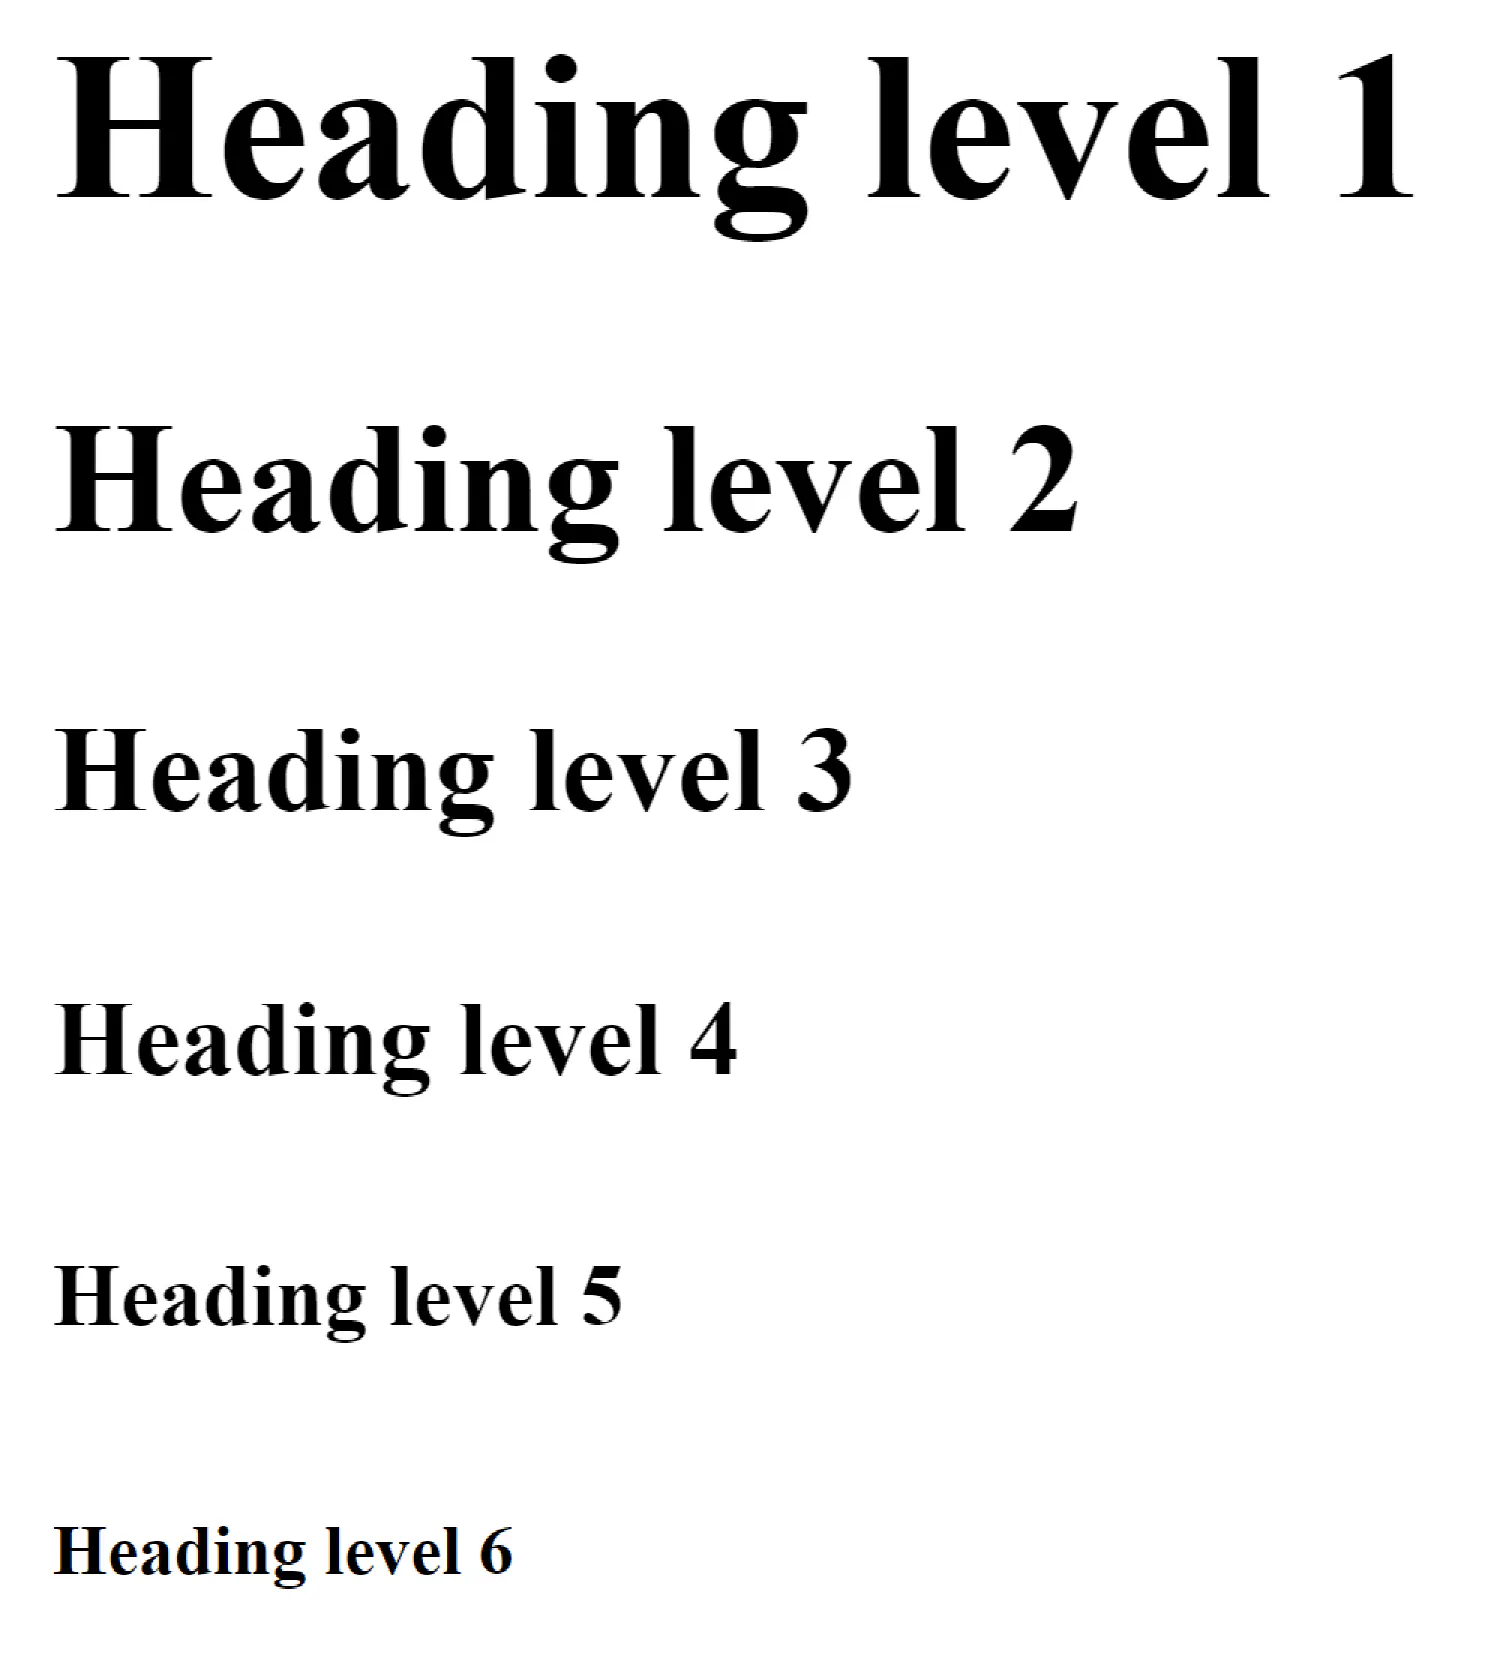
Headings are used to defining the hierarchy and structure of the web page. HTML offers six different levels of heading, from <h1> to <h6>. <h1> is the most important heading, and it should summarize your entire page content, which is why there should only be one <h1> heading in the HTML file.
| |
Open the .html file in the browser, and it should be rendered like this:
Paragraphs on the other hand, are defined with the <p> tag:
| |
In HTML, you cannot change how the paragraphs are displayed in the browser by adding extra spaces or extra lines in the code. They will be automatically removed by the browser. For instance, the following two paragraphs will produce the same result.
| |
However, what if we do want a line break? The answer is simple, we use a <br> element:
| |
The output will be:

Formatting elements #
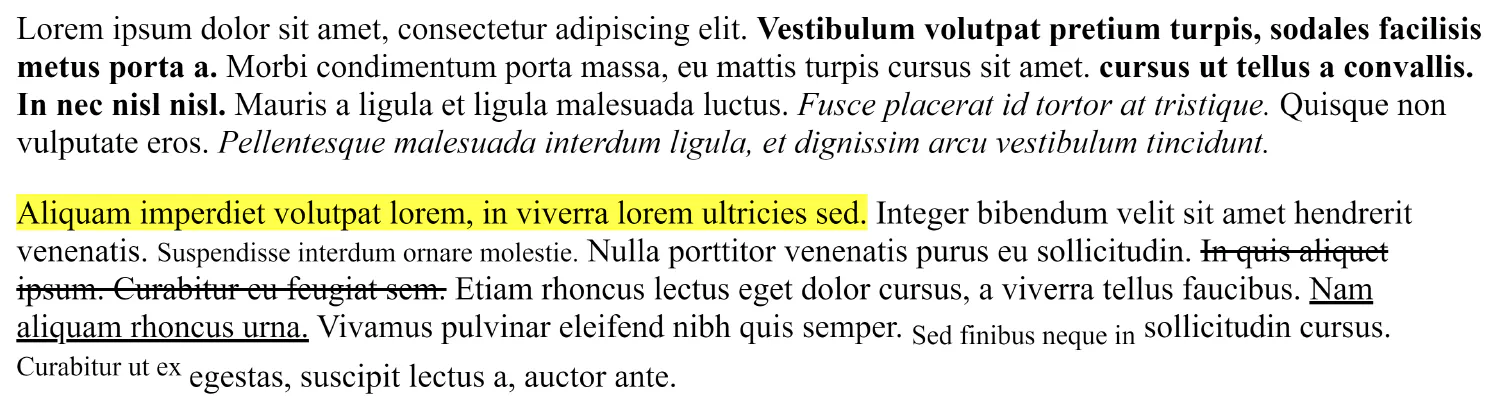
The formatting elements are a special collection of elements that give texts special meanings and appearances.
<b>- Bold text<strong>- Important text<I>- Italic text<em>- Emphasized text<mark>- Marked text<small>- Smaller text<del>- Deleted text<ins>- Inserted text<sub>- Subscript text<sup>- Superscript text
Let’s see how each of them looks in the browser:
| |
Links #
Links are found on nearly all web pages. They allow users to travel from page to page. When you click on a link, it takes you to another HTML file, and this simple action forms the foundation of the internet. The links are defined as follows:
| |
The browser will display an underlined text, and when you click on it, it will take you to https://www.example.com/ .
By default, when you click on a link, the target shows up in the same browser tab. You can change this behavior using the target attribute.
_self- Default. Opens the document in the same window/tab as it was clicked_blank- Opens the document in a new window or tab_parent- Opens the document in the parent frame_top- Opens the document in the full body of the window
For example, the following link will take you to a new tab:
| |
Tables #
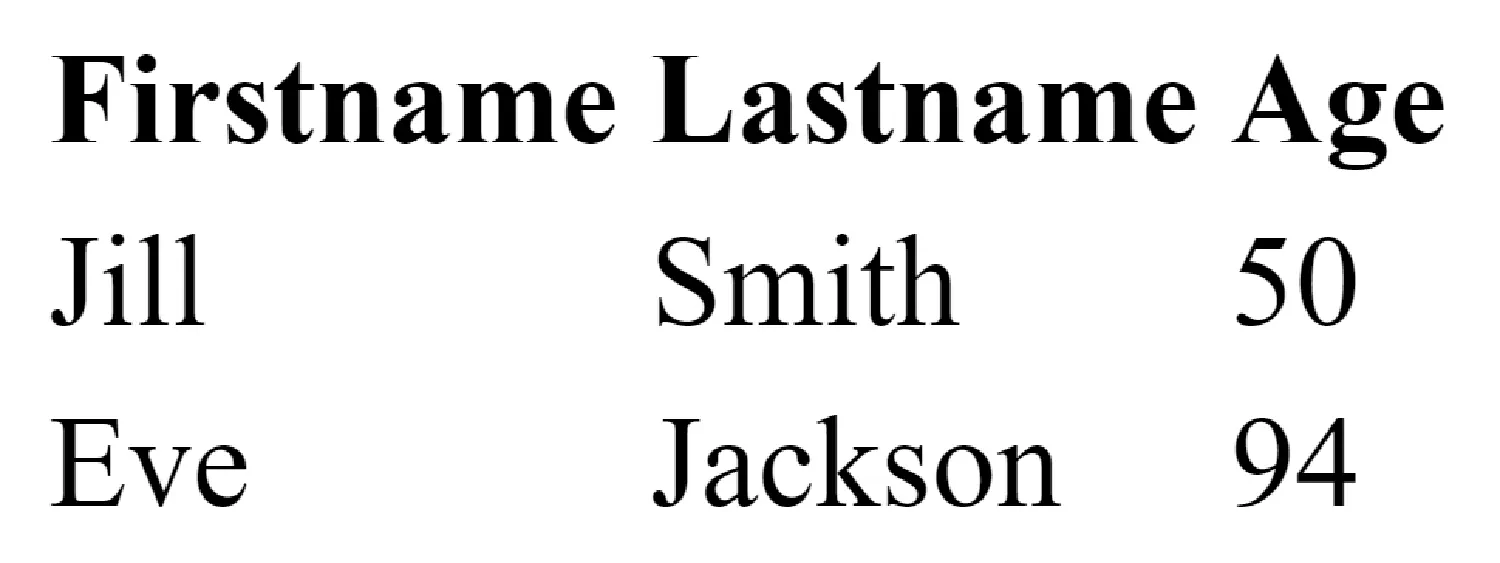
In HTML, tables are defined using the <table> tag. Each row is defined with a <tr> tag, and each data cell is defined with a <td> tag. If you want a header for the table, you need to use the <th> tag. By default, the texts in <td> elements are regular and left-aligned, and the text in <th> elements are bold and centred.
Here is an example:
| |
This may look a little strange to you since this table is borderless. To add a border to this table, we need to utilize another language called the Cascading Style Sheets (CSS):
| |

Lists #
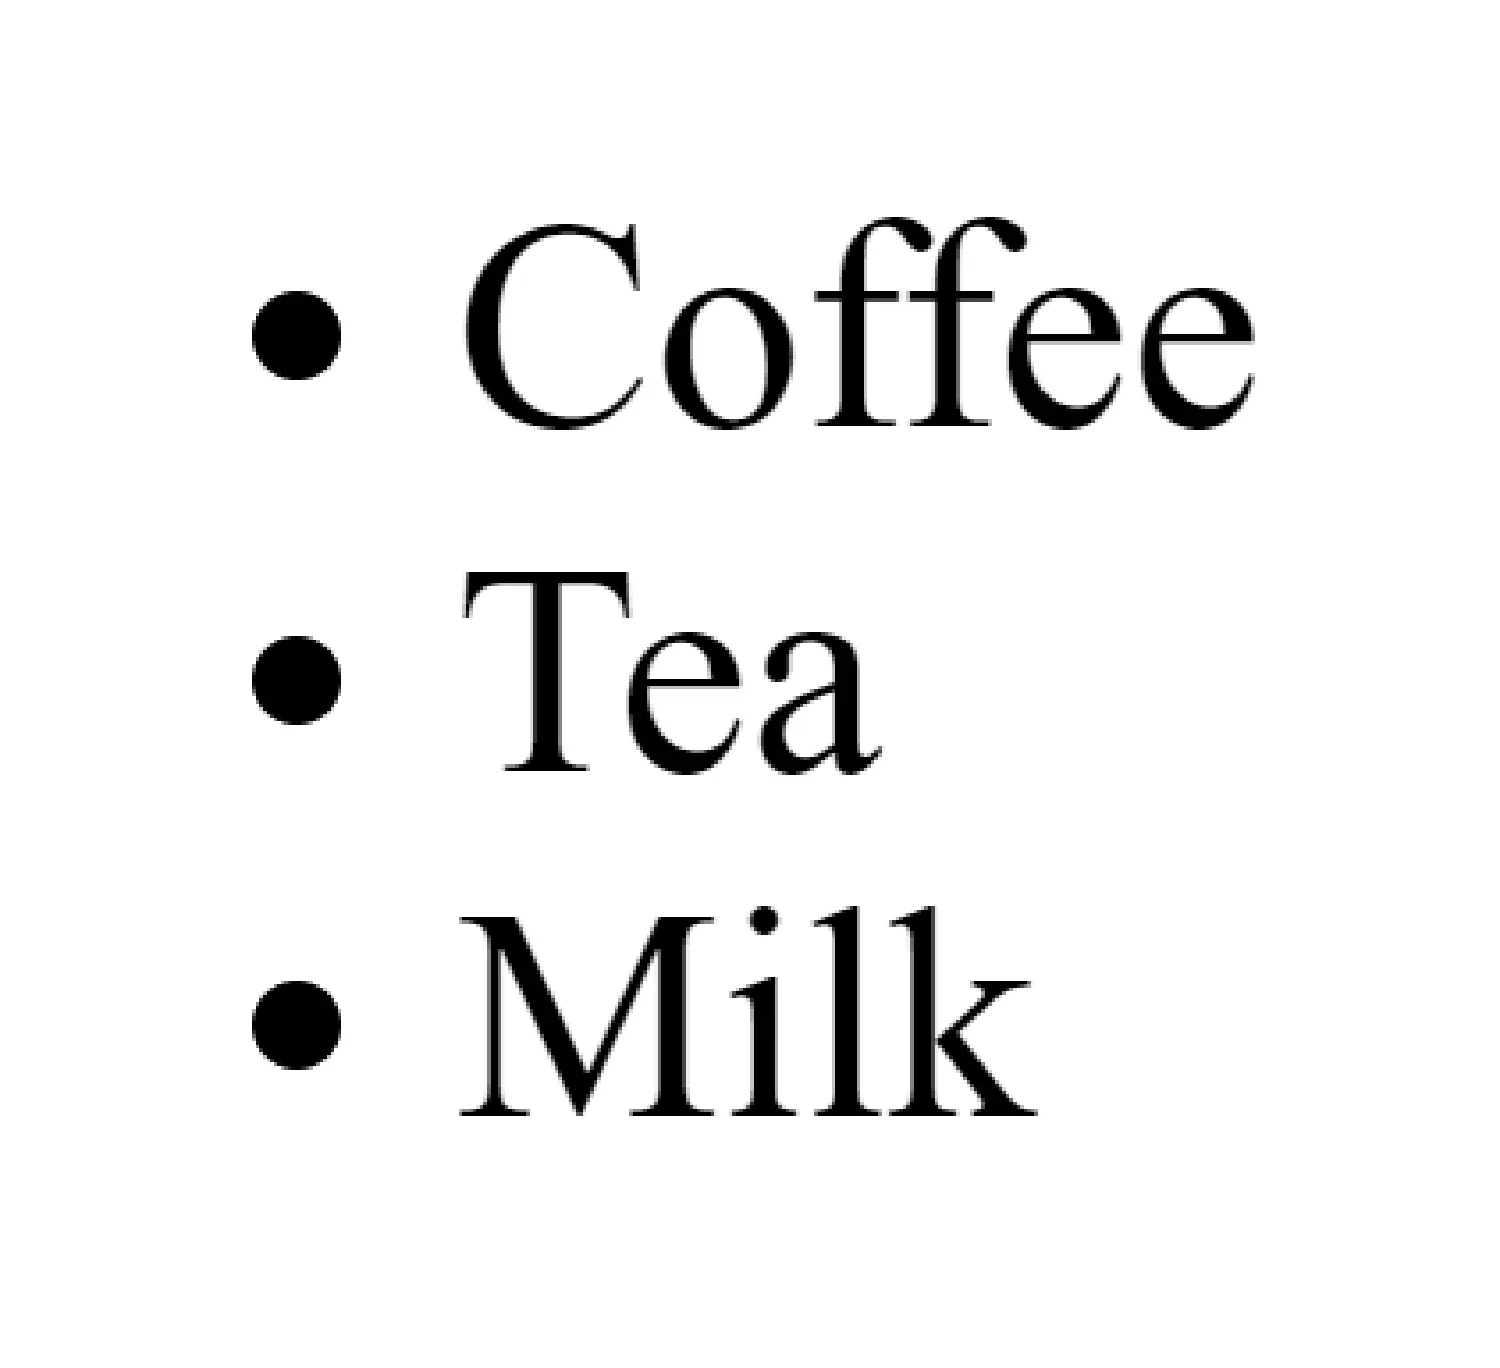
Lists are also commonly used on web pages. They are defined with a <ul> tag, and each element in the list is defined with a <li> tag.
| |
Lists can form a nested structure as well, meaning one <li> element could contain another <ul> element:
| |

The general layout #
Next, let’s dig deeper into the structure of an HTML file. We’ll first revisit the example we talked about previously.
| |
In this HTML document, the first line declares the DOCTYPE. This will inform the browser that the document being rendered is an HTML document. And next, there is an <html> element, which wraps around two other elements, <head>, and <body>.
The <head> section #
The <head> element is a container for metadata and is placed inside the <html> element and before the <body> tag. The <head> element usually contains information that the search engine or the browser might need, but won’t show up on the webpage.
The <meta> element is typically used to specify meta-information like the character set, page description, keywords, author of the document, and viewport settings. The information will not be displayed on the page but is used by browsers and search engines.
| |
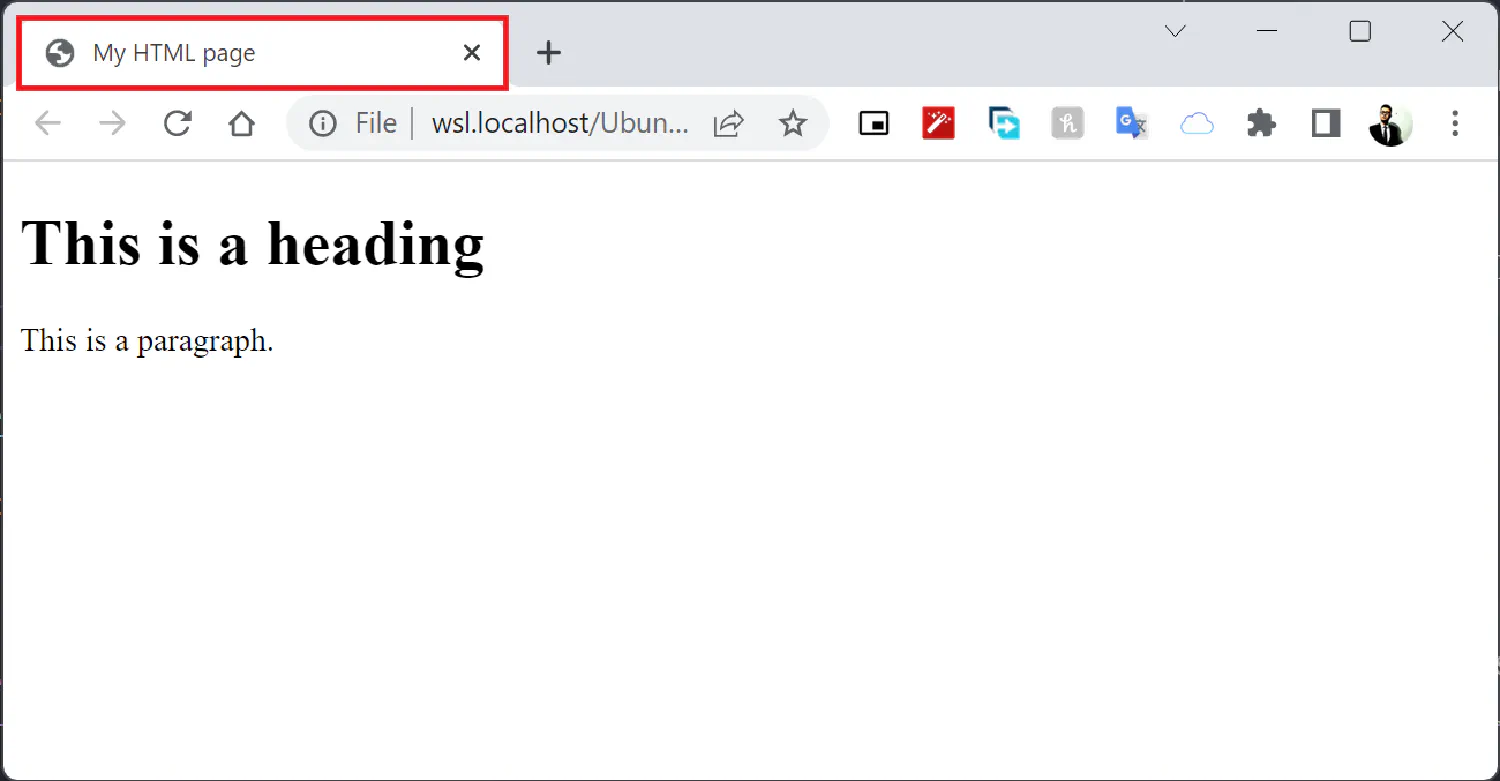
The <title> element defines the title of the document. It will be displayed on the page’s tab in the browser.
| |
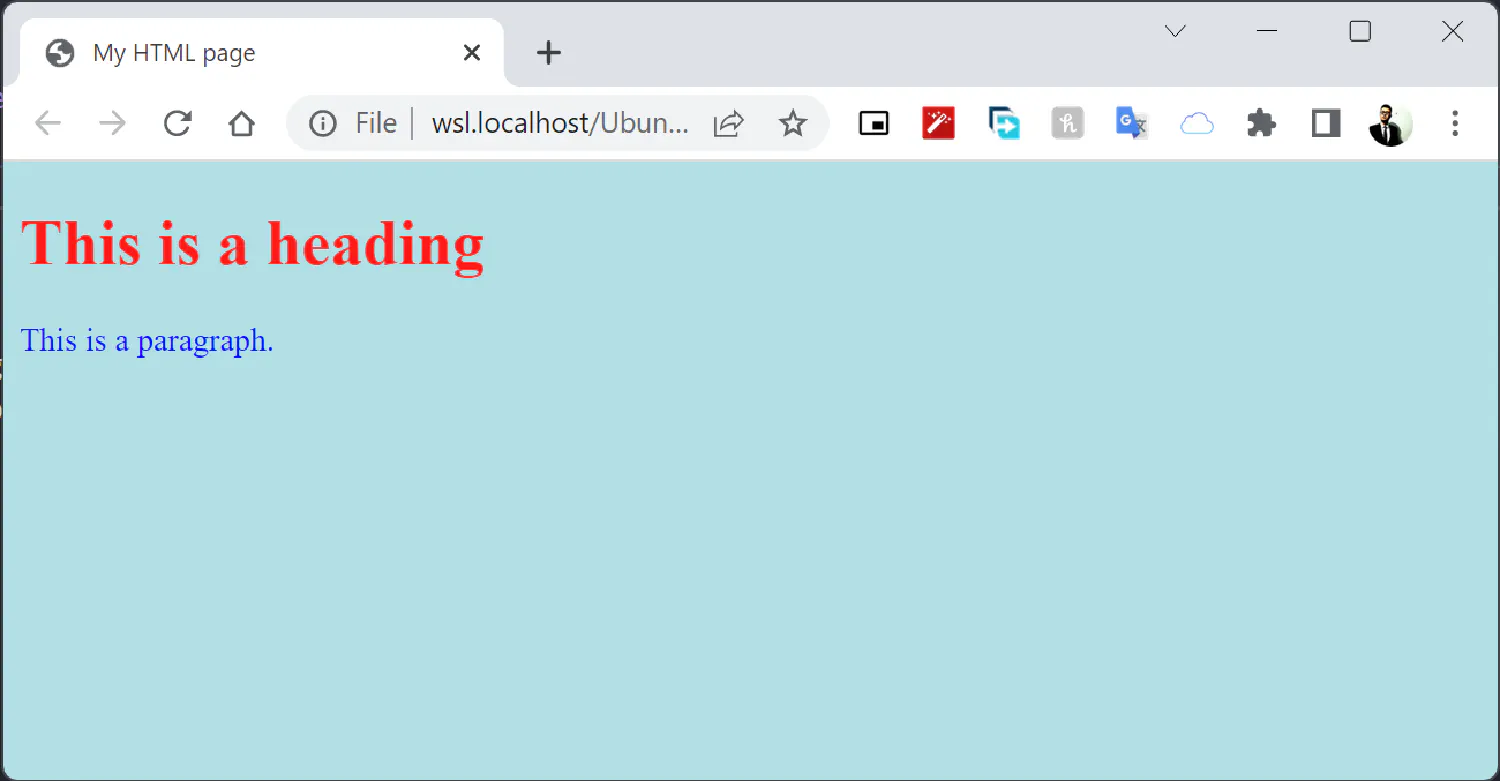
The <style> element can be used to define style information (CSS) for a single HTML page, as we’ve seen before.
| |
The <body> section #
The <body> element is a container for all the other elements. It contains everything that will be displayed in the browser. These elements could be roughly categorized as block elements and inline elements.
As the name suggests, each block element defines a “block” in the web page. It always starts on a new line, and without CSS, it always takes up the full width available and always has a top and a bottom margin. Again, to avoid making this article boring, the following list only consists of several most commonly used block elements. If you are interested, here is the complete list from W3Schools.
- The
<div>element is non-semantic. It does not have a specific meaning, which means it can be used to define any “block” on the web page. - The
<section>element defines a section in a document. A section is a group of content under the same topic. Typically, there are multiple sections in a single HTML document. For instance, a web page could be split into sections for introduction, content, and contact information. - The
<article>element specifies independent, self-contained content. An article should make sense on its own, and it should be possible to distribute it independently from the rest of the website, like a blog post, or a newspaper article. - The
<header>element represents a container for introductory content or a set of navigational links. The header of an HTML page usually contains the name of the website, a logo, a navigation bar, and maybe a short introduction of the website. - The
<footer>element defines a footer for a document or section, and as the name suggests, it is always at the bottom of a web page. A<footer>element typically contains copyright information, contact information, and sometimes a sitemap for the website. - The
<nav>element defines a set of navigation links, and sometimes a search button. - The
<aside>element defines some content aside from the content it is placed in (like a sidebar). The<aside>content should be indirectly related to the surrounding content, like a search bar, a signup form, and some related articles.
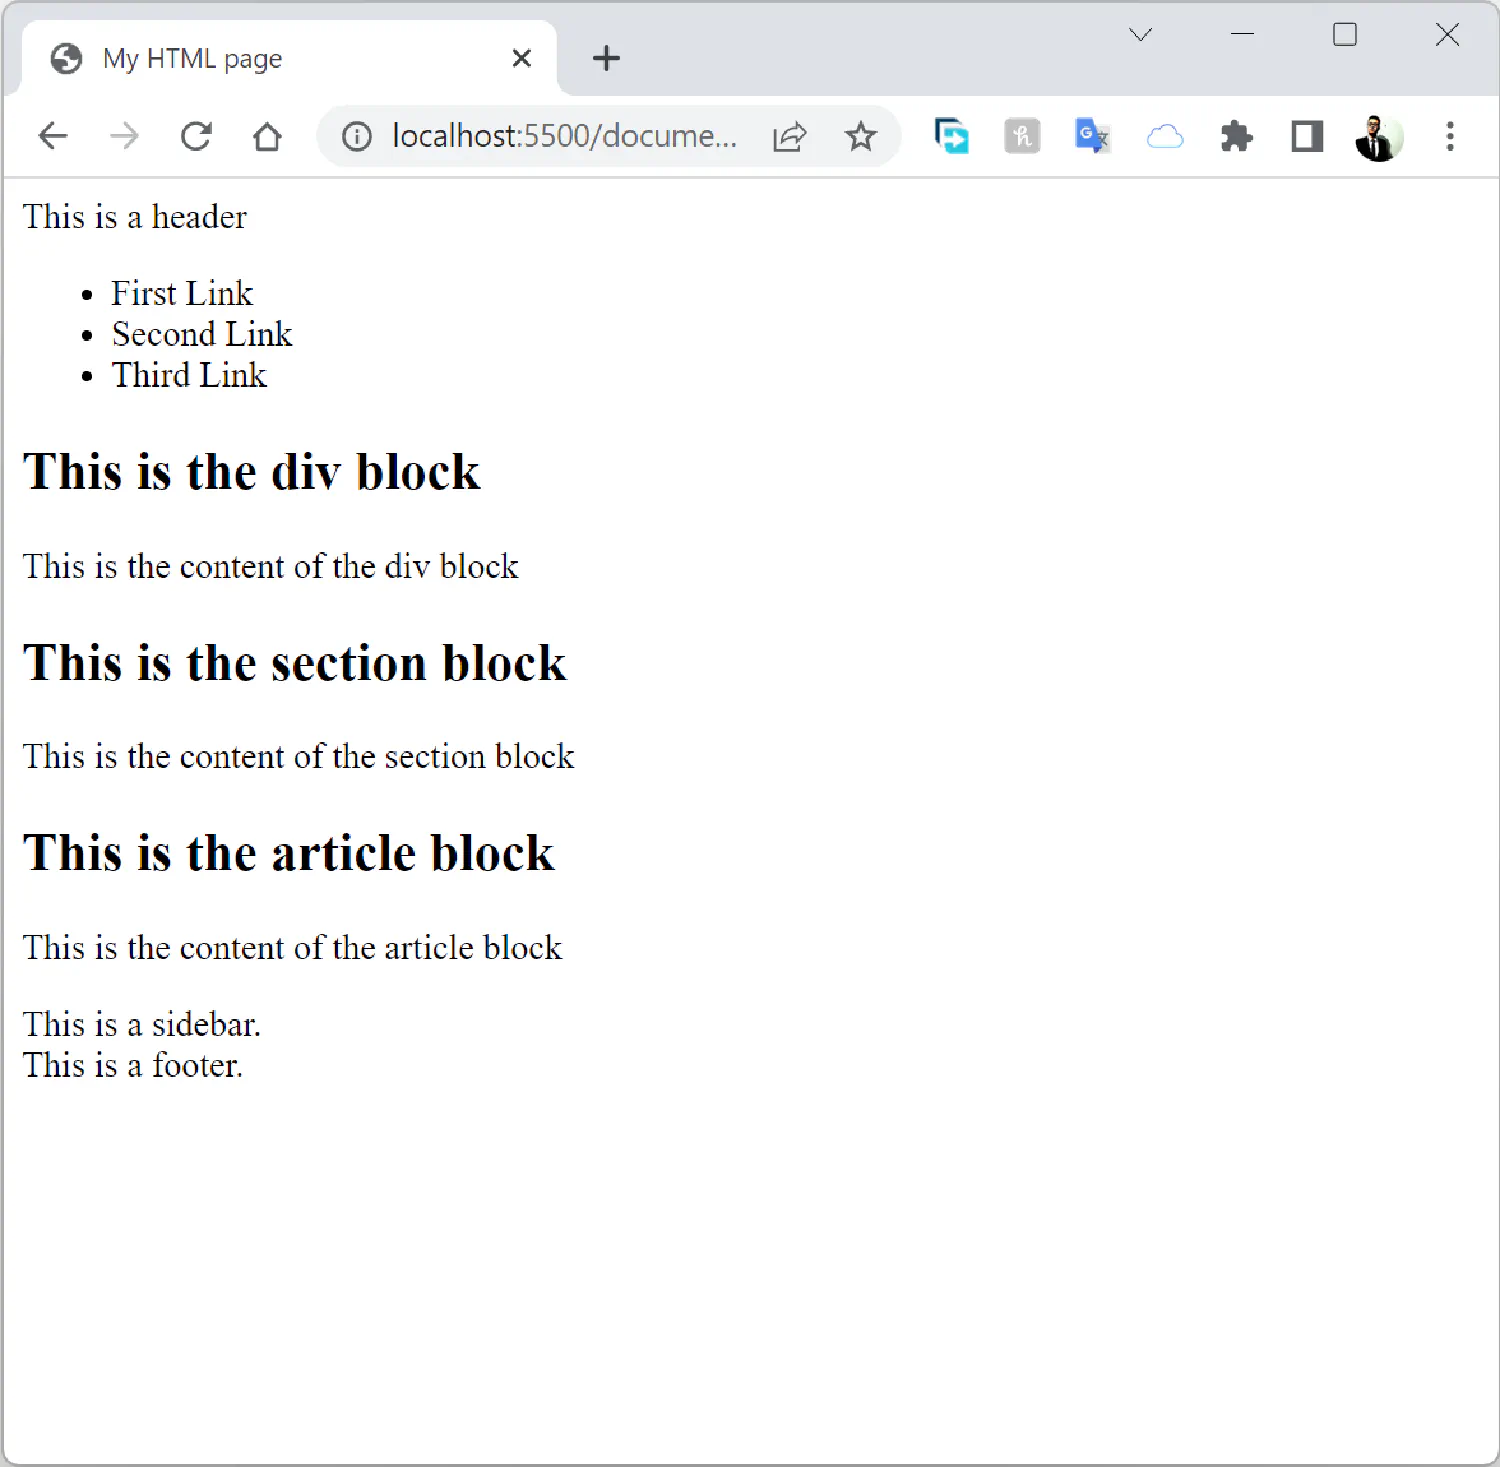
With these block-level elements, we are able to design a basic layout for the HTML page like this:
| |
Inline elements do not start on a new line, and they only take up as much width as necessary. For example, the <span> element is an inline element that you can put in the middle of a text. By default, it does not have margin, padding, or anything that would affect the appearance of the text. When used together with CSS, the <span> element can be used to style parts of the text.
| |

Besides <span>, the link element (<a>) and the formatting elements (<i>, <b>…) are also inline elements. To save us some time, I will not repeat all of them here.
One last thing to be noted is that a block element can contain multiple inline elements, but an inline element cannot contain a block element.
If you think my articles are helpful, please consider making a donation to me. Your support is greatly appreciated.