JavaScript Basics #2
- JavaScript Basics #1
- JavaScript Basics #2 ← You are here
- JavaScript Basics #3
- JavaScript Basics #4
- JavaScript Basics #5
Previously, we discussed some data types that are built into JavaScript, such as strings, numbers, and Boolean values. In this article, we are going to talk about two new data types that allow us to group all of these values together to create more complex structures, they are called arrays and objects.
Creating arrays in JavaScript #
Let’s first talk about arrays. An array is a list of values wrapped inside a pair of square brackets, separated by commas.
| |
We can access the elements in the array by referring to their index number, which starts from 0 instead of 1. This is a very common thing in computer programming, you should get used to it.
| |
What if we want to access the last element of the array, and we don’t know the length of the array? Instead of trying every index starting from 0 to see if it gives a value, we can access the length of the array using arrayName.length. The length here is called a property and . is how we can access the property of a value. For example:
| |
In this example, listOfNumbers.length gives us 5, because we start from 1 when we calculate length. However, since the index always starts from 0, that means the index of the last element should be 1 less than the length, hence the listOfNumbers.length - 1 here. We’ll discuss properties and methods (properties with function values) in detail later in this article.
It is also possible to change the values in the array.
| |
Array loops #
In some cases, we may need to iterate over the entire array and access each element one by one. There are two different ways we can do this in JavaScript.
| |
This is the method we’ve seen before, for every iteration, the variable e will be assigned the next element in the array list, and you can do something with the variable e inside that for loop.
The second method is to use the index.
| |
In this example, the variable i is bound to the index of the array elements, and e is bound to the array element with the index i. The expression i++ is a shorthand notation of i = i + 1.
Stacks and queues #
Stacks and queues are two very important data structures in computer programming, which we can implement using arrays.
A stack is a structure of elements based on the principle of last in first out (LIFO). It is like a stack of books. If you want to add a new book to the stack, you would put it on the top, and if you want to remove a book, you would remove the one on the top as well.
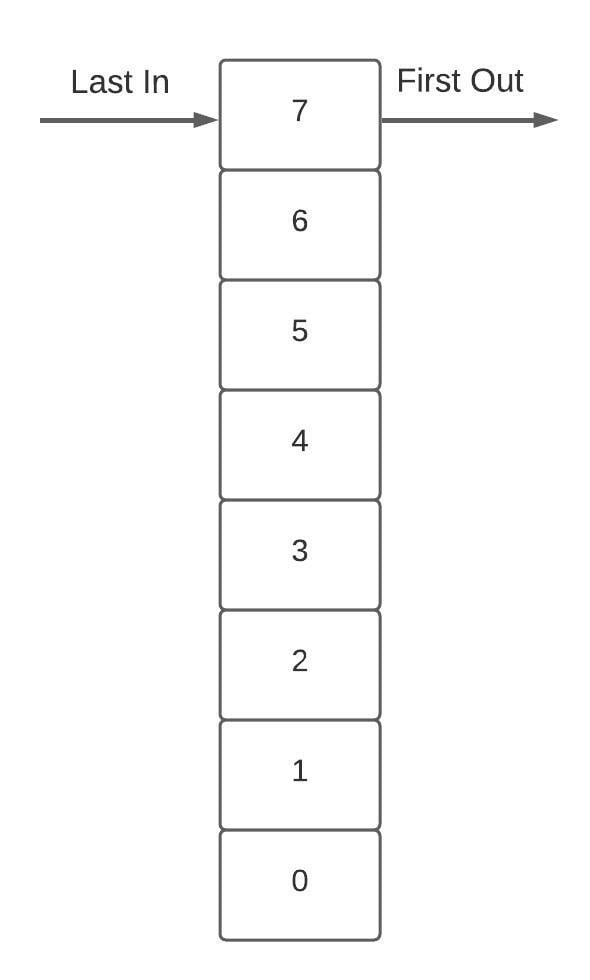
The stack data structure has two fundamental operations:
The push operation is used to insert a new element onto the stack.
The pop operation is used to remove the most recent element from the stack and return its value.
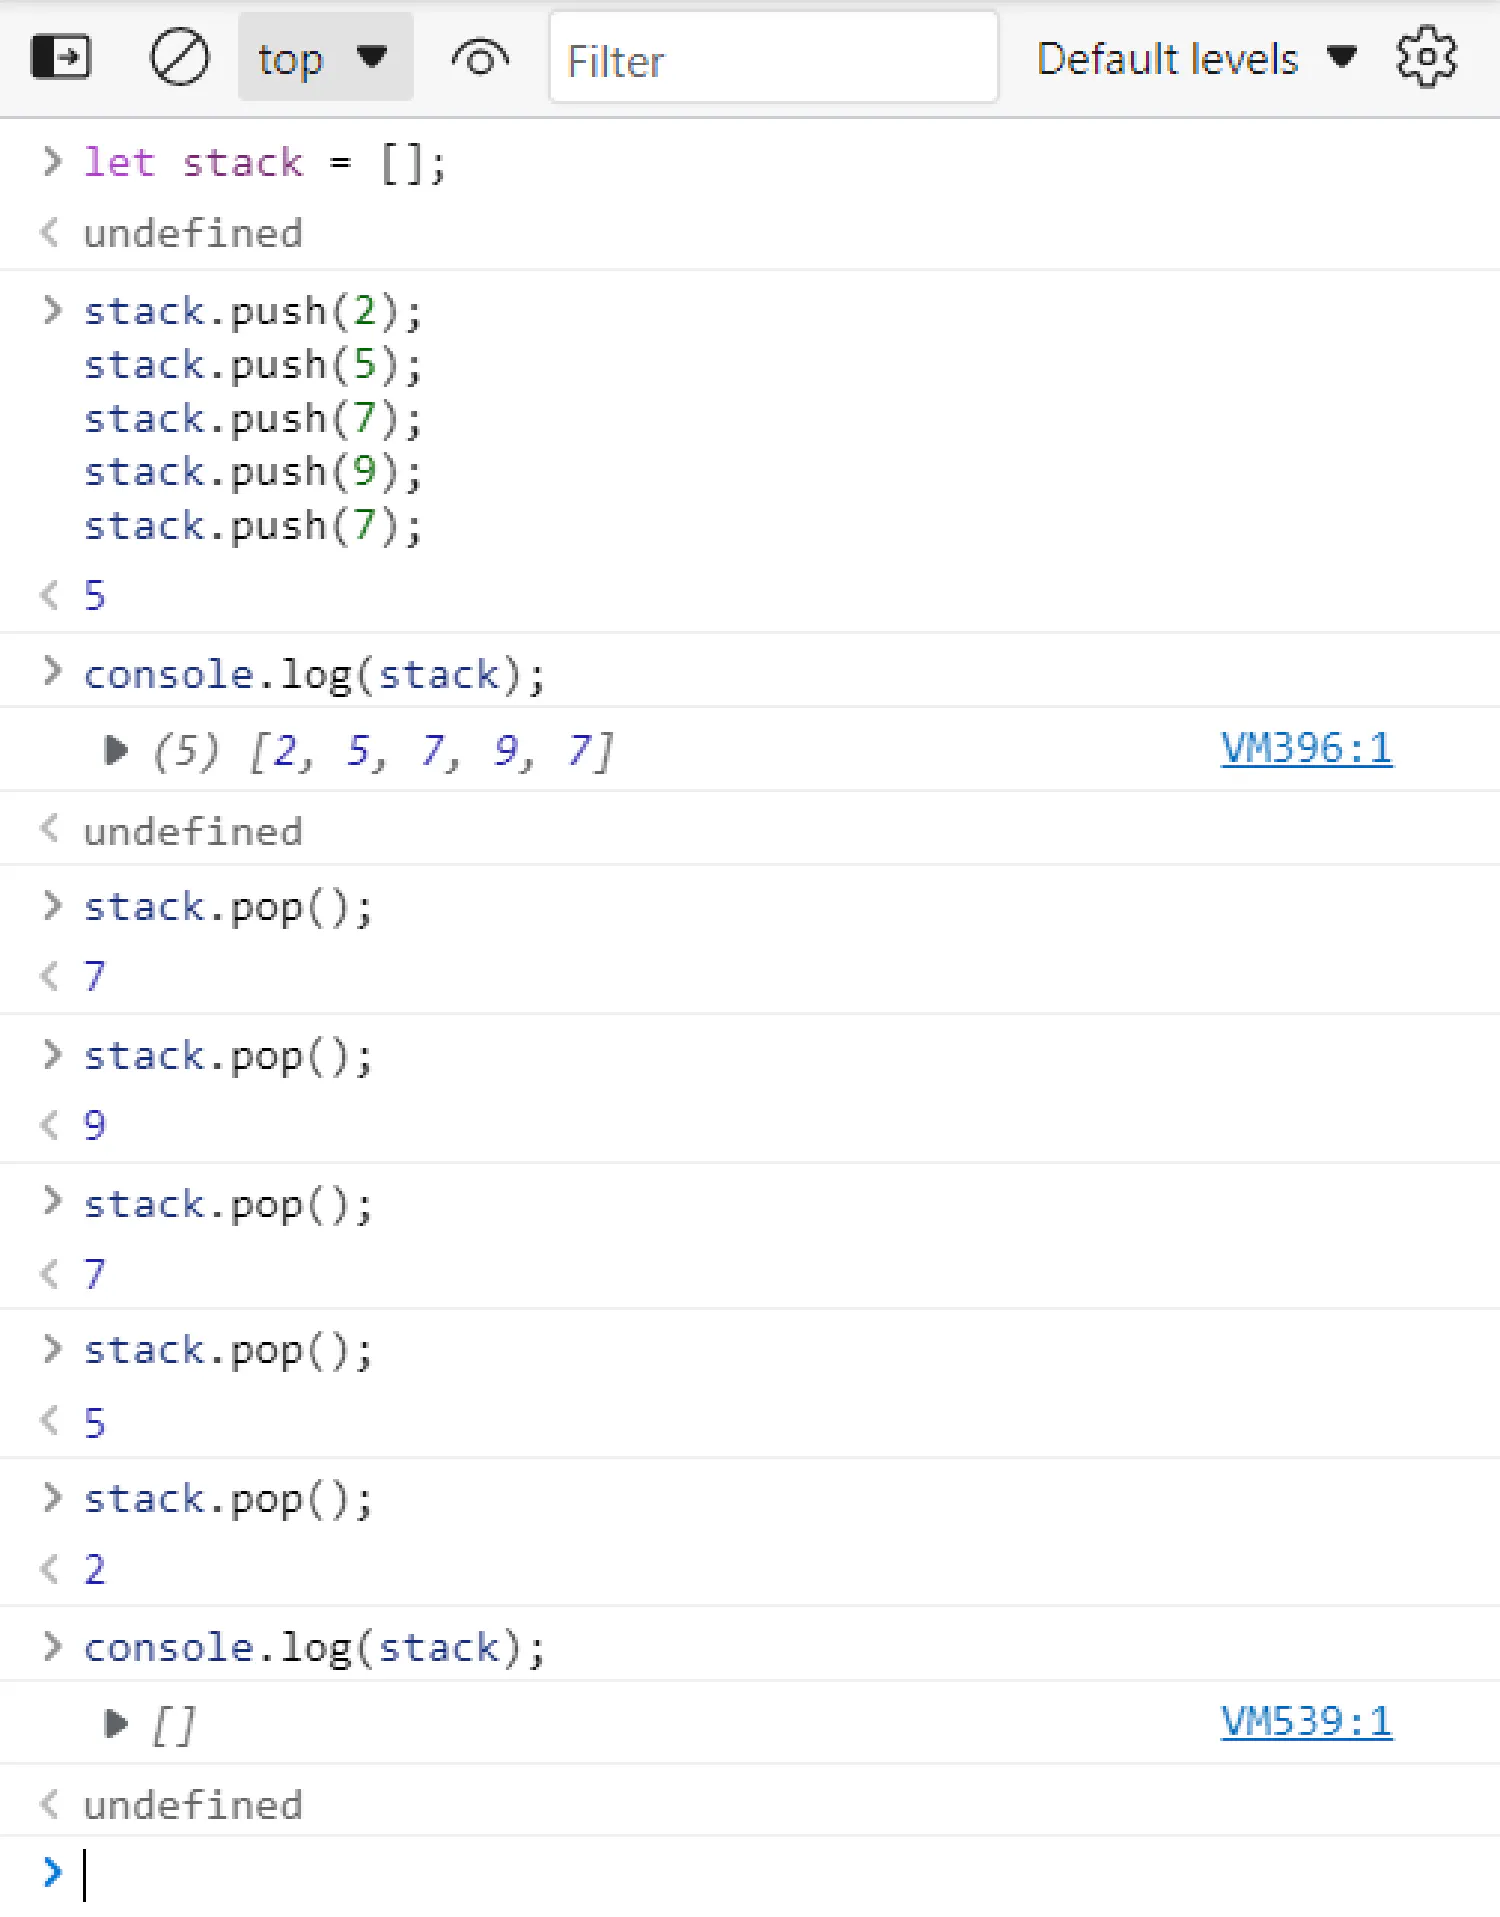
Luckily, JavaScript offers these two methods out of the package. To use them we can, again, use the . operator, because methods are just properties with function values:
| |
A queue is another very useful data structure. It is very similar to stacks, except it follows the first in first out (FIFO) principle. It’s like waiting in line in a restaurant, if you come first, you will get the food first.
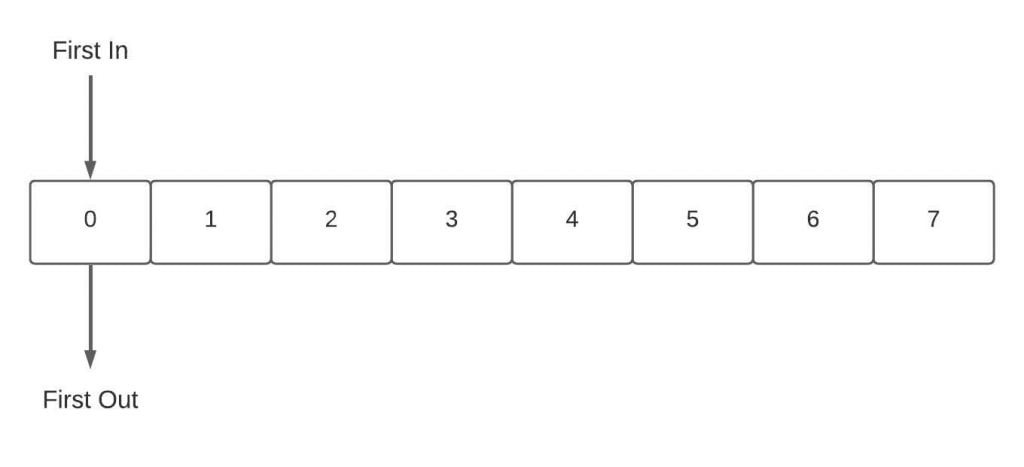
The queue data structure has two fundamental operations as well:
The enqueue operation is used to insert a new element at the end of the queue.
The dequeue operation is used to remove the element at the beginning of the queue and return its value.
There are also two methods built into JavaScript that help us with these two operations, however, the terminologies are a bit different. For the enqueue operation, we can use the push() method, because it pushes the new element to the end of the array. As for the dequeue operation, we can use the shift() method, which removes the first element of the array.
| |

Objects in JavaScript #
Properties and methods #
Now, let’s take a closer look at the concept of property which we were just talking about. We’ve seen some strange-looking expressions like listOfNumbers.length and Math.max. These are expressions that access the property of some value. In the first example, we access the length property of the listOfNumbers array. In the second example, we access the max property in the Math object.
Almost all of the data types we talked about have built-in properties. For example, a string also has a length property just like arrays, which store the length of that string.
In addition to the length property that only holds a number, there are also a number of properties that hold function values. For instance, we could use the toUpperCase property of a string to get a copy of that string in which all letters in that string are converted to uppercase. We usually refer to these properties with function values as methods.
| |
Notice that invoking the toUpperCase() method does not change the string variable’s original value.
Write our own properties #
All of the properties we’ve talked about so far are built-in properties, and they all come with JavaScript. But, what if we want to create our own properties? Objects are the second data type we are going to discuss here which allows us to create our own properties.
An object is an arbitrary collection of properties, defined using the curly braces {}. For example, here we define an object named house:
| |
Inside the braces is a list of properties separated by commas. Each property is defined in name: value format.
In this example, there are four members in the house. To access that information, we can use the same notation we used before, with a dot (.).
| |
The objects are also mutable, which means their values can be modified. We can do that by using the = operator. For example:
| |
However, this only applies to the properties we created ourselves. The properties of the other data types, such as strings, numbers, and arrays, their properties are immutable, and cannot be modified. For instance, if you have a string that contains "cat", it is not possible for you to write some code to change a character in that string to make it spell "rat".
JSON #
Before we move on, I’d like to introduce another data structure that is widely used in the web dev field, it is JSON.
When you define a property (name: value), the name does not actually contain its value. Instead, it is stored in the computer memory as an address, which points to the location in the memory where the value is stored.
If you want to save the data in a file or send it to someone else over the internet, you’ll have to somehow convert these tangles of memory address into a description that can be stored or sent over the internet. This process is called serialization, which means the data is converted into a flat description. A popular serialization format is called JSON(JavaScript Object Notation, pronounced “Jason”).
JSON looks just JavaScript’s way of defining objects, with a few extra restrictions. The property names have to be surrounded by double quotes, and no functions or anything that involves actual computation, only the simple data types are allowed. So, if we express our house object in JSON format, it would look like this:
| |
JSON is widely used as a data storage and communication format on the web, even in languages other than JavaScript. We will encounter it again as we talk about backend development in the future.
What is object-oriented programming #
In the previous section, we talked about a new data type called the objects. In computer programming, objects are not just a simple data structure, it is very commonly used as a way to organize code. Programmers would group values and functions with close relationships to each other, and put them in the same object, which makes them easier to access. This method of organizing your code is called object-oriented programming. In this section, we’ll discuss how these ideas could be applied in JavaScript.
Encapsulation #
The core idea of object-oriented programming is to split a program into small pieces, and each piece only minds its own business. People working on other pieces of code don’t need to know how this piece of code is written, or that it even exists.
Sometimes the different pieces need to communicate with each other to perform a more complicated task. To make this work, programmers would create a property/method inside the object that is allowed to talk to the outside, this method is said to be made public, and they are usually referred to as the interface. While the actual implementation is hidden inside the object as private properties, meaning they cannot be seen or accessed by the outside code. This way of separating the interface from the implementation is called encapsulation.
Most programming languages have very distinctive methods of denoting public and private properties, usually with keywords public and private. JavaScript, however, does not have this functionality built-in, at least not yet. But JavaScript programmers still follow this idea of encapsulation, by putting an underscore character (_) at the beginning of the properties that should be made private. But since this is not JavaScript’s built-in functionality, technically you could still access these properties from the outside, but that is something you should never do, for security reasons.
Methods #
As you know, methods are just properties with functions as their values. This is a simple method:
| |
Sometimes, the method needs to do something to the object it was called on, such as taking two numbers that are stored in the object, and adding them up, or taking a string value from the object and processing it. To do this, we can use the this keyword, which is a binding that automatically points to the object that was called on. Let’s take a look at an example:
| |
Prototypes #
Look at the following code:
| |
Notice that even though we defined an empty object, we still manage to pull a property from it. Well, technically, that property is not from the object, it’s from the object’s prototype. A prototype is basically another object on which our empty object is based, and it acts as a fallback source of properties. If you are trying to access a property that does not exist in the object, JavaScript will automatically search its prototype for that property.
JavaScript offers a method (Object.getPrototypeOf()) that returns the prototype of a data type. For example, let’s try finding out the prototype of that empty object we just created:
| |
The Object.prototype is the ancestral root of all objects that we create, but not all data types share the same prototype. For instance, the functions derive from Function.prototype, and arrays derive from Array.prototype.
| |
However, since those prototypes are still just objects, they also have a prototype, and that is usually Object.project. This is why almost all of the data types we’ve talked about have a toString method that converts objects into a string representation.
In fact, we can create our own prototype and use Object.create() method to create objects using a specific prototype.
| |
Classes #
In object-oriented programming, there is a concept called class, which works just like the prototypes. A class defines the shape of a type of object (just like prototypes), what kind of properties and methods it has. Such an object is called an instance of the class.
To create an instance of the class, we need to make a new object, which derives from the prototype/class. But you also have to make sure that the object has the properties that an instance of the class is supposed to have, not just the ones derived from the prototype/class. This is what a constructor function does.
| |
If you are familiar with other programming languages that follow the idea of object-oriented programming, you’ll see that this is a very awkward way of defining a class and constructor function, but I think it does help you understand what a constructor function is. Luckily, after 2015, JavaScript offered us a new and more standard way of making a class, by using the keyword class.
| |
To create an instance of this class, we can use the keyword new.
| |
The constructor() function which we defined in the class will be automatically executed when you run this code.
Getters, setters, and statics #
Now, let’s focus on the interface part of object-oriented programming. In case you forgot, the interface is the part of the object that can be “seen” from the outside. Programmers use the interface to make different pieces of code work together to solve a complex problem.
There are typically two types of these interface methods, getters and setters. Getters retrieves information from the object, and setters write information to the object. Let’s consider this example of a temperature converter.
| |
Notice that we have a static method in this example. Statics are not part of the interface, they are in charge of attaching additional properties to your constructor function, instead of the prototype. In our example, it is used to provide a different way of creating a class instance, using Fahrenheit.
Inheritance #
JavaScript also provides us with an easy way to create a class based on another class, with new definitions of some of its properties. For example, the following class defines a matrix. In case you don’t know, a matrix is a two-dimensional array.
| |
There is another type of matrix that is called a symmetric matrix. It has all the characteristics of a regular matrix, except it is symmetric along its diagonal. To create such a matrix and avoid rewriting the same code all over again, we can make the SymmetricMatrix extends the Matrix class like this:
| |
If you think my articles are helpful, please consider making a donation to me. Your support is greatly appreciated.