Laravel for Beginners #2 - The MVC Structure
- Laravel for Beginners #1
- Laravel for Beginners #2 ← You are here
- Laravel for Beginners #3
- Laravel for Beginners #4
- Laravel for Beginners #5
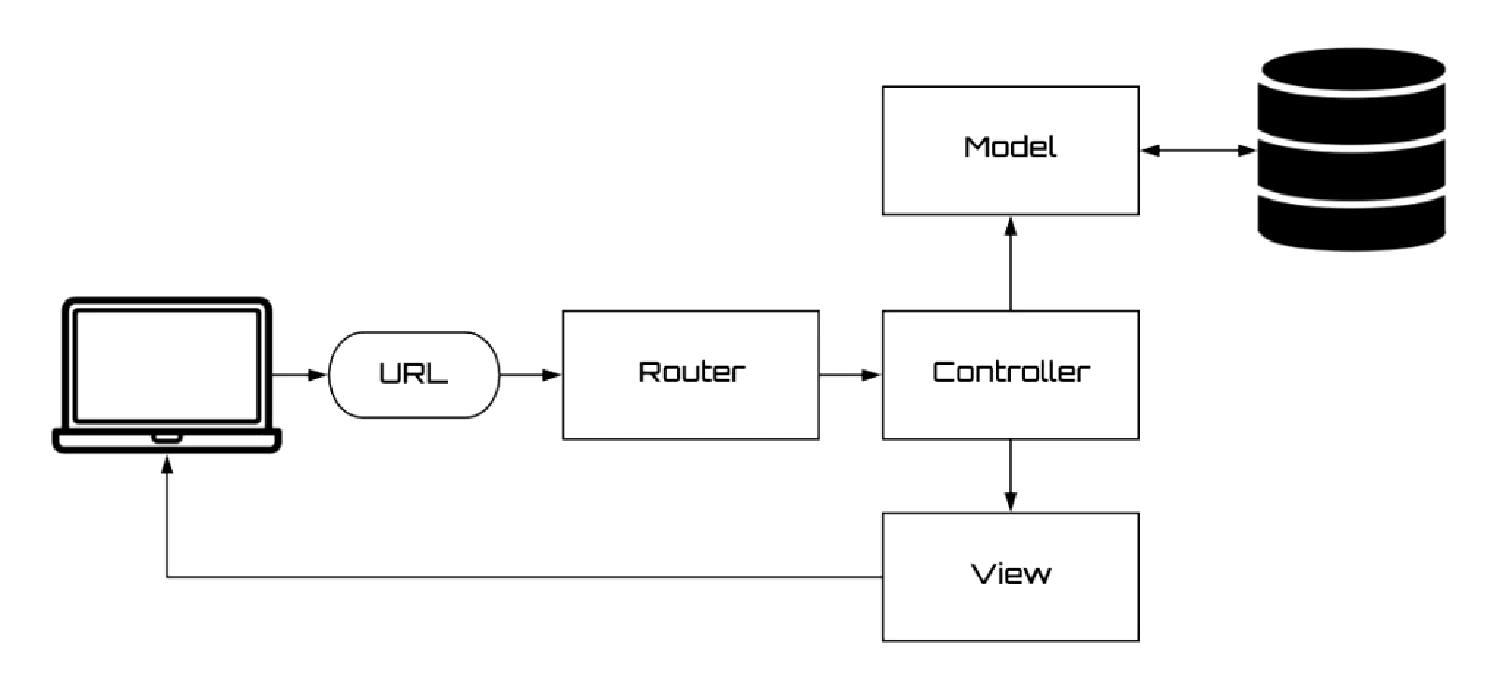
In this article, we are going to talk about the MVC structure of Laravel. The MVC structure is a web design principle that consists of a model (M), which is in charge of communicating with the database, a controller (C), which is the place we store the logic of our application, and a view (V), which is the frontend interface of the app.
Typically, in a web application, there will be a router, which we’ve discussed before. The router will point to a controller, the controller will look for the required data in the database through the model, and then put the retrieved data to the corresponding location in a view, and finally return that view back to the user.
➡️ Get the source code for FREE!
The view layer #
Let’s start with views. Recall that in the previous article, we defined this route:
| |
This route points to a view welcome, which is stored in the resources/views directory, and it has an extension .blade.php. This extension informs Laravel that we are using the Blade template system, which we’ll talk about later.
To create another view, we simply create another file with the same extension inside the views directory.
greetings.blade.php
| |
We also talked about that it is possible to pass data from the route to the view like this:
| |
In this case, we assigned the variable name with the value 'James', and passed it to the greeting.blade.php we just created. And in order to display this data in the view, we can use the double curly braces {{ }}.
greetings.blade.php
| |
For a large web application, it is very common for you to organize your view files in different folders. For example, your app could have an administration panel, and you probably want to store the corresponding views in a folder called admin. When pointing to view files in a nested structure from the router, remember to use . instead of /.
| |
This example points to the home.blade.php file in the views/admin/ directory.
Blade template syntax #
By default, Laravel’s views utilizes the Blade template. It is actually very similar to the components system in Vue.js, if you have been following my course on Vue.js. We know that views are just HTML documents, and the Blade template adds programming features like inheritance system, flow control, loops and other programming concepts. It allows us to create a more dynamic webpage while writing less code.
if Statements
We can build if statements using directives @if, @elseif, @else, and @endif. They work exactly the same as the if statements you see in other programming languages.
| |
We can test this code with a route:
| |
Here, we assume num can only be 1, 2 or 3.
switch Statements
| |
Loops
Loops could be a simple for loop:
| |
Or a foreach loop. For every iteration, $user equals to the next element of $users.
| |
Even a while loop:
| |
These are very basic stuff, and they work exactly like their PHP counterparts. However, there is one thing special about these loops, which is the $loop variable.
For example, you have something that you only want displayed once, in the first iteration, then you can do this:
| |
This time, the paragraph element <p>This is the first iteration.</p> will only be rendered once in the first iteration. There are other properties you can access, you can read about them here . Note that the $loop variable can only be accessed inside a loop.
Conditional Class
We know that class is the most commonly used way to assign styles to different HTML elements, and by changing the class of an element, we can easily change the look of that element. Laravel offers us a way to dynamically assign classes based on variables.
| |
In this example, the existence of classes font-bold and bg-red will be based on the truthiness of variables $isActive and $hasError.
Building the layout #
When we are building a web application, there are always some parts of the page that will appear on multiple pages. It would be a waste of time and resources if you write the same code over and over again, and it’s not good for maintenance. The smart thing to do here is to separate the part that will appear multiple times and put it into another file, and we’ll simply import it when we need it.
Laravel offers us two different ways to do this, template inheritance and components. For beginners, I think template inheritance is a lot easier to understand, but components do offer more features. Let’s start with template inheritance.
Template Inheritance
As an example, here we are trying to define a home page, and here is our route.
| |
Typically, we’ll have a layout.blade.php, which imports the necessary CSS and JavaScript files, as well as the navbar and the footer, since they will appear on every page. And in our home.blade.php file, we’ll extend to layout.blade.php.
layout.blade.php
| |
home.blade.php
| |
Notice that @section('title') matches @yield('title'), and @section('content') matches @yield('content').
In this example, when the home page is being rendered, Laravel will first see the directive @extends('layout'), and it knows to go to layout.blade.php. And then, Laravel will locate the @yield('title') and replace it with the title section, and then find the @yield('content') directive and replace it with the content section.
Sometimes we’ll need to load another view from the current view. For example, we want to add a sidebar to our homepage. Since it is something that will be included in some pages but not the others, we don’t want to put it in the layout.blade.php. However, it will be very difficult to maintain if you create a sidebar for every page that requires it. In this scenario, we can create a sidebar.blade.php file, and then use the @include directive to import it into the home page.
| |
Components
The component system in Laravel is actually a lot similar to the one in Vue.js, so if you followed the course on Vue components, this shouldn’t be too hard.
Again, we are building a home page, and we also need a layout, but this time we’ll define it as a component. All we need to do is create a components folder under resources/views/, and then create our layout.blade.php inside.
views/components/layout.blade.php
| |
To use this component, we need to use the <x-layout> tag. Always remember the x- prefix.
| |
The content inside this <x-layout> element will automatically be assigned to the variable $slot. However, what if we have multiple slots? Like our previous example, we have a title and a content section. To solve this problem, we can define a <x-slot> element.
| |
The content of this <x-slot name="title"> will be assigned to the variable $title, and the rest will still be assigned to the $slot variable.
| |
Dealing with databases in Laravel #
Before we can talk about the model and the controller layer of the MVC structure, we need to first discuss how to deal with databases in Laravel.
In our course on JavaScript and Node.js, we used a .txt file to store information. In a real-life web application, that is obviously not going to work. The common practice is to use a database for storing information.
Since we used Laravel Sail to create this project, a MySQL database has been prepared for us. Make sure you have the following environmental variables in the .env file:
| |
Database migrations #
Right now, this database is empty, in order to use it, we need to add some database tables. These tables will have columns, and the columns will have names and some special requirements. The process of setting this up is called running migrations.
In Laravel, all the migration files will be stored in the database/migrations directory. And we can create a new migration file with a simple command.
!!! Important Note:
- If you used Sail to create this Laravel project, in order to run PHP inside the Docker container, please replace
phpwith./vendor/bin/sail.- If you didn’t use Sail, please proceed as normal.
| |
We can apply the migration file like this:
| |
If you want to roll back the previous migration:
| |
Or reset the migrations completely:
| |
Create table
However, before creating our own migration file, let’s take a look at an example. Open the migration file database/migrations/2014_10_12_000000_create_users_table.php, which comes with Laravel.
| |
In this migration file, we have a class with two different methods. up() is used to create new tables and columns, while down() can be used to reverse the operations performed by up().
Inside the up() method, Laravel uses a the create() method inside Schema class to create a new table called 'users'. From line 17 to 23, each line creates a different column with a different name and type. For example, $table->string('name'); creates a column called name inside the users table and that column should store strings.
Here is a full list of column types available in Laravel. We are not going through all of them, but instead, we’ll discuss why we choose the specific column type as we encounter specific problems in the future.
Notice line 19, $table->string('email')->unique();, there is something else here, after we’ve declared the column name and type. The unique() is called a column modifier, it adds extra constraints to that column, in this case, it makes sure that the column cannot contain repeating values, each email the user provides must be unique.
Here is a full list of column modifiers available in Laravel.
Make changes to table
Besides creating tables, it is also possible for us to update a table using the table() method:
| |
This code adds a new column age to the existing table users.
Rename a table:
| |
Drop a table completely:
| |
Seeding #
Seeder is used to generate dummy data to your database, this way it is easier for you to run tests. To generate a seeder, run the following command:
| |
This command will generate a seeder for the user table, which will be placed in the database/seeders directory.
UserSeeder.php
| |
To execute this seeder, run the following command:
| |
Query builder #
The query builder is an interface that allows us to interact with the database. For example, we can use the table() method provided by the DB class to retrieve all rows in a table.
| |
We can add more constraints by chaining a where() method.
| |
This code will get all the rows where the value in the column age is greater than or equal to 21.
There are a lot of other methods besides where() and get(), we’ll talk about them later when we encounter specific problems in the future.
The model layer #
Model is a very important concept in modern web design. It is in charge of interacting with the database of our web application. The model is in fact a part of Laravel’s Eloquent ORM (Object-Relational Mapper) system. Think of it as a query builder, with some extra features. We can use the make:model command to generate a new model.
| |
If you’d like to generate a corresponding migration file, use the --migration option.
| |
app/Models/Post.php
| |
By default, this model assumes that there is a posts table in the database. If you wish to change that setting, set a $table property like this:
| |
Retrieving model #
The eloquent model is a powerful query builder that allows us to communicate with the database. For example, we can use the all() method to retrieve all the records in the table.
| |
Notice here we imported the Post model, instead of the DB class. The Post model will automatically connect with the posts table.
Since models are query builders, that means all the query builder methods can be accessed here.
| |
When you are using all() or get() to retrieve data, the value that is returned is not a simple array or object, but instead, it is an instance of Illuminate\Database\Eloquent\Collection. This Collection provides a few more powerful methods than a simple object.
For example, the find() method can be used to locate a record with a certain primary key (usually the id).
| |
In this example, $post will be the post with id==1.
Inserting & updating model #
We can also insert or update records using the model. First, make sure the corresponding model has a $fillable property, and ensure you list all the columns that should be fillable.
| |
After that, we can use the create() method to create a new record.
| |
Or, you can update existing records with the update() method.
| |
Deleting model #
There are two methods allowing you to delete records. If you wish to delete a single record, use the delete() method.
| |
If you want to mass delete records, use the truncate() method.
| |
Database relations #
That’s all the basics we need to cover for models. However, we are not quite done yet. In a typical web application, database tables are usually not independent but correlated. For example, we could have a user who has posts, and posts that belong to a user. And Laravel offers us a way to define these relations using the Eloquent models.
This section is probably a little challenging for beginners, but don’t worry, we are going to come back to this topic when we start building our blog app. Here I only picked the ones we need to use to build a simple blogging system.
One to one #
This is the most basic relation. For example, each User is associated with one Pet. To define this relationship, we need to place a pet method on the User model.
| |
Now, what if we want to do the opposite? The inverse of has one would be belongs to one, meaning each Pet would belong to one User. In order to define the inverse of the one-to-one relationship. We place a user method on the Pet model.
| |
However, we are not quite done yet. We must also make some changes to the corresponding database tables. The User model assumes that there is a pet_id column inside the users table, and it stores the id of the pet that the user owns.
Also make adjustments to the corresponding pets table. There should be a user_id column storing the id of the user that this pet belongs to.
One to many #
A one-to-many relationship is used to define relationships where a single model owns multiple instances of another model. For example, one Category could have many Posts. Similar to the one-to-one relation, it can be defined by putting a posts method in the Category model.
| |
However, sometimes we need to find the category through the post. The inverse of has many would be belongs to. In order to define the inverse of the one-to-many relationship. We place a category method on the Post model.
| |
This relation assumes the posts table contains a category_id column, storing the id of the category this post belongs to.
Many to many #
The many-to-many relation is a little more tricky. For example, we can have a User who has many roles, and a Role which has many users.
| |
| |
This relation assumes there is a role_user table in the database. And the role_user table contains user_id and role_id columns. This way, we can match the user with the role and vice versa.
To make things clearer, imagine we have a role_user table like this:
| user_id | role_id |
|---|---|
| 1 | 1 |
| 2 | 1 |
| 3 | 2 |
| 1 | 2 |
| 2 | 3 |
For a user with id=1, there are two roles, each with id=1 and id=2. If we want to do things backward and find users through a role, we can see that for a role with id=2, there are two posts, id=3 and id=1.
The controller layer #
Now that we’ve studied routes, views, models as well as database relations, it’s time to talk about the thing that connects them all together. Remember when we talked about routes, we discussed an example like this?
| |
It looks fine right now, but when you have a huge project, putting all the logic in the route file will make it very messy. A better solution would be making sure that the route always points to a method in a controller, and we’ll put the logic inside that method.
| |
To create a new controller, use the following command:
| |
Laravel’s controller files are stored under the directory app/Http/Controllers/.
Basic controller #
Let’s take a look at an example. The show() method expects a variable $id, and it uses that id to locate the user in the database and returns that user to the view.
| |
Sometimes, you need to define a controller that only has one method. In this case, we can simplify the code by changing the method’s name to __invoke:
| |
Now we don’t have to specify the method name in the route.
| |
Resource controller #
The resource is another modern web design concept we need to talk about. Usually, we see all the Eloquent models as resources, meaning that we perform the same set of actions on all of them, create, read, update and delete (CRUD ).
To create a resource controller, we can use the --resource option:
| |
The generated controller will automatically contain the following methods:
| |
The comments explain their corresponding function and purposes.
Laravel also offers us a very easy way to register routes for all of these methods.
| |
The following routes with different HTTP methods will be automatically created.
| HTTP Method | URI | Action | Route Name |
|---|---|---|---|
| GET | /posts | index | posts.index |
| GET | /posts/create | create | posts.create |
| POST | /posts | store | posts.store |
| GET | /posts/{post} | show | posts.show |
| GET | /posts/{post}/edit | edit | posts.edit |
| PUT/PATCH | /posts/{post} | update | posts.update |
| DELETE | /posts/{post} | destroy | posts.destroy |
If you think my articles are helpful, please consider making a donation to me. Your support is greatly appreciated.